
This is the first of a three-part look at some ways to use a Raspberry Pi for amateur radio purposes. First off, I’m going to start with using the Pi as a basic software-defined radio (SDR).
What is a Raspberry Pi?
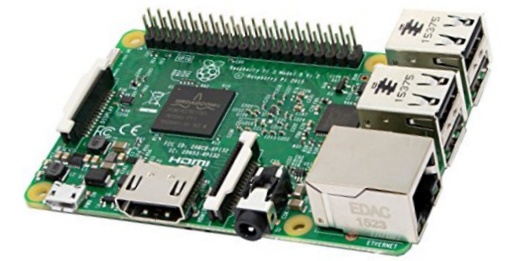
It’s a £30 computer motherboard. Connect to a screen, keyboard and mouse, and you’re on your way. The Raspberry Pi uses the Linux operating system (as opposed to Windows), and it pretty powerful. There are several different models, and at the time of writing, the Raspberry Pi 3 is the current model, which is fast enough to cope with the cheap RTL SDR dongle, so it’s ideal for amateur radio. You can pick up a Pi online from Amazon – Raspberry Pi at Amazon
Raspberry Pi as SDR?
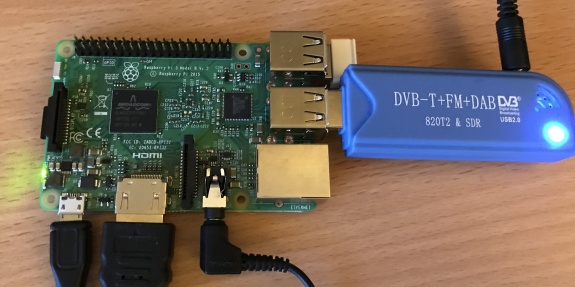
This is something I’ve wanted to try for a while – using my £10 Realtek RTL dongle with a Raspberry Pi as a cheap software defined radio. I first experimented with this in 2016, but my original Raspberry Pi was too slow for it to be of any use. I’m trying again, this time with some different SDR software and the much faster Raspberry Pi 3.
As I’m not a Raspberry Pi expert, I rely on a mix of online guides and Googling to get this sort of thing working. After some trial-and-error, I managed to get the Pi up-and-running, listening to audio from across the radio spectrum:
Setting it up
In case anyone else wants to try this, here’s a short guide on how I managed to get this up-and-running:
What I needed:
- A Raspberry Pi 3 (Mine was £30 from Amazon, including the Micro SD card pre-loaded with the operating system)
- RTL SDR USB Dongle (£10)
- Micro USB charger and lead (2.5A or 3A power supply, not a 1A version)
- USB keyboard & mouse (any will do, even a pocket keyboard/touchpad)
- HDMI to VGA adapter (to connect from the Pi’s HDMI socket to my old VGA monitor)
Preparing the software
The Raspberry Pi 3 supplied by Amazon came pre-loaded with the Raspian operating system on a Micro SD card, and out of the box, booted up to a desktop. In the past, I’ve purchased a Raspberry Pi that came without an operating system, meaning I had to download an install one. Getting one all ready to run was a bonus.
First step was to connect the Pi to the Internet. The Pi supports wi-fi (icon, top-right), and getting online was as straightforward as connecting any smartphone or laptop to a wireless hotspot.
Next, download the SDR software. (Don’t connect the SDR dongle at this point). I opted for a package called GQRX. Open the Pi’s web browser (icon, top left), and go to www.gqrx.dk – Go to the download page and select the Raspberry Pi build.
This downloads a compressed file, which you extract into a folder – I opted for the /pi/ folder
Then, open the folder called /gqrx(plus version number)
In that folder, is a Readme file, which contains some important instructions. There are two ‘dependencies’ that have to be installed to make GQRX run – the GNU Radio and Qt5 libraries. You can copy and paste the lines from the readme file straight into the Terminal (black icon with white arrow)
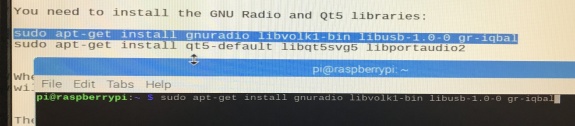
Installing GNU Radio took several minutes (a lot of stuff to copy) – the Pi is downloading and installing the files over the Internet. The QT5 files were slightly quicker.
With both of those installed, I next connected the SDR dongle into a free USB port, and ran gqrz from the /pi/gqrz(version) folder. A box pops up asking you to confirm you want to Execute, which is obviously a ‘yes’.
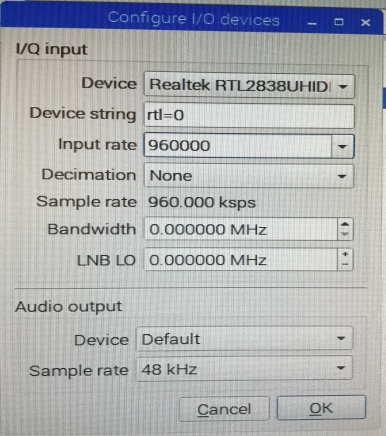
A box pops up asking you to select device settings. My RTL dongle appeared in the “Device” pull-down. Same yourself some hassle, and also change the “Input rate” to 960000 (I discovered this later in the journey!). Hopefully, your “Configure I/O devices” screen will look like this:
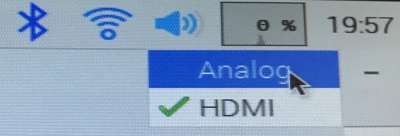
Another “gotcha” I discovered later – sound defaults to the HDMI cable by default. My speaker was plugged into the 3.5mm jack, and it took me a while to puzzle out why I was getting no sound. Right-click the speaker symbol (top-right) and select the correct output:
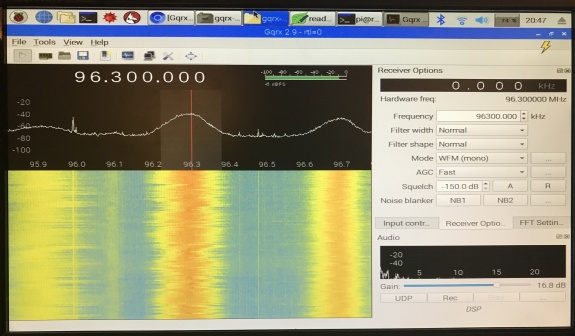
Once past the Configure I/O screen, you’re at the main SDR window. At this point, my dongle was plugged in and connected to the cheap antenna. I opted for a broadcast commercial radio station, to keep things simple. A few settings that I’d suggest tweaking:
- Input Controls tab: Tick “Hardware AGC” and “DC Remove”
- Receiver Options tab: Mode “WFM (mono)” and AGC to “Fast”
Now, give it a try. With the dongle, antenna and speakers/headphones plugged in, dial up a radio station frequency and press the first GQRX icon (play symbol)
Hopefully, a waveform like this one, and audio will start playing. If it’s quiet, turn up the gain from the gain tab (FFT tab, bottom right) or the main speaker volume (top right).

Other things to know:
I discovered two very useful things during my experiments, which I’ll share with you.
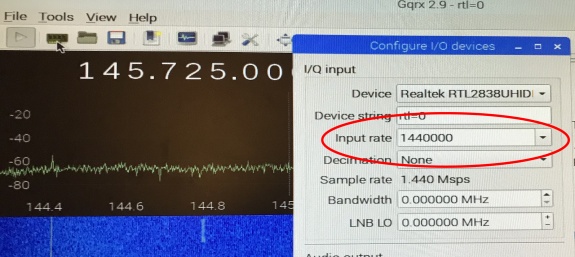
Input Rate: This is a surprisingly important setting.The default setting is too high, resulting in juddery audio. You may need to do some experimenting. If you’re interested in viewing the entire range 144MHz to 146MHz, then this value will need to be changed, but there will be a drop in audio quality. Here’s me changing it for use monitoring a local repeater in decent quality, whilst seeming adjacent frequencies:
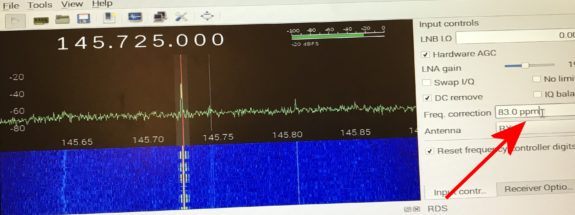
Tuner accuracy: The cheap RTL dongles aren’t perfect. Setting a frequency doesn’t necessarily mean that you’ll be bang on frequency. This can be an issue when tuning to narrowband data signals. This becomes relevant for a later part of this trilogy of articles. The trick here is to tune to a frequency (such as a simplex 2m frequency), zoom in on-screen, and transmit with a nearby handheld to see how far out your dongle is. You can fine-tune by setting an offset. Mine required a positive adjustment of 83ppm, as shown here:
Some of the Gotchas:
- Staggery/glitchy audio? For me, it was dropping the Input rate that fixed this – the default setting was too high. The FFT tab “FFT size” can also be dropped from the default 8192 to 2048, which makes the processor work a little less hard.
- Use a decent power supply. In earlier experiments, I found the Pi kept losing the connection to the dongle. Online reading revealed this to be a common issue if not using the recommended current to run the Pi 3. The recommended supply is 2.5A (my old Pi was OK with 0.5A). Some phone chargers are 1A, and I inadvertently used one of these and all appeared well, but it couldn’t power the RTL dongle.
Hopefully, this short article is of use. If you have any questions, please add a comment below.
Two more articles on how to use a Raspberry Pi for amateur radio… coming soon
You could over-clock the Raspberry Pi, this might allow some, increase of the sampling rate. On doing this, heatsinks will need to be added to the Pi before use and extreme over-clocking may risk damaging the cpu/gpu.
https://hackaday.com/2018/01/16/__trashed-5/
https://www.hackster.io/dmitry21/overclock-your-raspberry-pi-3-402ffa
Older models
https://www.maketecheasier.com/overclock-raspberry-pi/
Stephen G7VFY
Also, to reduce the strain on whatever power supply (2-3A on Pi 2 or 3) you are using with the Raspberry Pi, it might be be a good idea to use a POWERED USB HUB, especially if you are planning to overclock as current consumption will increase.
I bought on of these before xmas with a PI2.
https://www.maplin.co.uk/p/the-fuze-powered-by-raspberry-pi-n21dc
Stephen G7VFY
Good tips. Thanks Stephen! Pete
We did a write up on this in March 2016, it has the full set of instructions and some additional tips which may also help the user get the best from this install.
http://chertseyradioclub.blogspot.co.uk/2016/03/raspberry-pi-3-gqrx-sdr-radio-and-fun.html
Thanks guys. This page didn’t come up when I was researching the topic, probably because I was researching for the £10 RTL dongle, not the £150 Funcube SDR. I’m assuming your install process would be slightly different for the RTL (no need for sudo apt-get install gr-fcdproplus, for example), but still very helpful especially for Funcube owners. Thanks for the link, Pete
Great informative article.
Sii…
Go here download image edit a few settings job done
http://qso365.co.uk/2017/02/setting-up-an-aprs-rx-only-igate-using-a-raspberry-pi-and-a-pre-built-image/
Aha David – Done it! That’s part 3 of this article :)
Hey Pete…
Joining foundation course Sunday.
No activity on this thread for a while but worth asking.
Does this GQRX allow remote use?
It would be nice to set the PI up and leave it up and for me to view the SDR software in a browser on any device on my local network to tune in whenever or where ever I am in the house
Shaun
The PI is an excellent device and I have about 6 or 7 in their various shapes. I have the original Funcube but got into RTL because I didn’t want to take the funcube through airports. However SDR on a PI is pushing it to It’s limits. Great for entry level as in “ooh it works” but for real DSP how about scavenging old laptops? Hard to get anything on Ebay these days but when someone says to you ” OH i broke the screen and i can’t be bothered with it anymore” then you can do wonders with a headless motherboard. There is a lot of mileage to be covered here. I have a HakRF that comes out of it’s box about once a year. My feeling now is that the manufaturers are trying to trickle this tech down to us so they can charge but also It’s also it’s there on your doorstep for cheap. Setup a decent SDR with a bit of grunt behind it and get it to mail you or ring your IP doorbell when an interesting signal pops up. Come on Amatuers do it before someone else does.
Good advice Paul. I must admit, this was very much an “ooh it works” exercise, and was done in preparation for an upcoming demo. You’re right on the spare parts, and rallies tend to be good for cheap refurb PCs and laptops ideal for just that purpose. Pete
One more thing though don’t become a “licenced Listener” – a comment I heard on the bands the other night…..
This is a great article & what the newbies need to get them more interested & inspired in the hobby good work pete
Hi Pete,
Just to let you know I followed your instructions and got it running on a RPi B 2. Had to reduce the sample rate to 300k. Receives FM broadcast mono but cannot cope with stereo.
Thanks for simplifying things. Will look out for parts 2 and 3.
Alan G4HTG
Just found this guys. All very good stuff. Am anticipating doing similar with a Pi-Top Ceed enclosure and latest RPi.
73 de Pat g4gvw
If you’re buying an SDR dongle for ham radio use I recommend getting one of the “premium” versions from Nooelec or RTL-SDR.com They have all the necessary input protection in place (sometimes the generic ones don’t), have an accurate TCXO reference oscillator (you shouldn’t need any frequency correction in the SDR application), come with an easier to use SMA connector for the antenna, and come in a metal case to dissipate heat. They cost a bit more than the generic ones – US$22 to 24 for the bare dongle or US$30 for a bundle that also includes an antenna – but they’re still pretty cheap.
i bought a nooelec and a pi over here to Thailand. using the SDR on a chromebook with linux and GQRX. pleased to report lots of 2M activity around Bangkok. On flight path of Don Muang airport but jumping around airband is a bit too much work. I paid under 30 quid on amazon for Nooelec and comes with 3 antennas. Gets very warm in 36 deg heat but ok. Will try 1090 at some point. Wish I’d bought a HT with me now. Next time.
No activity on this thread for a while but worth asking.
Does this GQRX allow remote use?
It would be nice to set the PI up and leave it up and for me to view the SDR software in a browser on any device on my local network to tune in whenever or where ever I am in the house
It sounds as though I got “stupid-lucky” when I ordered an SDR on Prime Day – I didn’t know that much, but picked the Nooelec bundle. Glad I made a good choice.
Just discovered about this type of radio reception Is sounds very interesting and have ordered a RTL SDR dongle to experiment with. Thanks to your very informative video
Mike Senior
I am using the neolec as I find the cheap ones don’t like rf ie a handheld nearby. My use is as a aprs 2 m I gate. The problem I’m having is the neolec is running very hot. And the pi becoming warm as well. Do you think running the pi through a powered hub would improve the heat issue. Thanks. Dave. G4FKI.
Thanks for the great tutorial Pete.
I’ve followed it on my RPi 3B+ and my new RPi 400. It works great, even on Windows(
I put it on because I was having a few problems with Airspy, such as sound not coming through the computer’s speakers. Thankfully I’ve managed to fix it now and it works well.).
73,
Noah, M7XMP