
Working amateurs around the world using data is a fascinating part of the ham radio hobby, and is definitely worth considering. On this page, we look at what the various amateur radio data modes offer, and how to get started using data.
Here’s a summary of the basics on how to start out operating the amateur radio digital modes.
Why data modes are worth a look:
- Data tends to work well with low power
- More bandwidth-friendly than voice
- Helps with language barriers for non-English speakers
- Electronic logging is often very easy with data modes
Getting started with data:
Here’s what you’ll need to get started with amateur radio data modes:
- An Interface – See below
- Cables to connect between the computer, radio and the Interface
- A computer with a soundcard (mic and speaker sockets)
- Software – There are various different packages depending on what mode you want to work
- The right frequencies – Each mode typically has a dedicated frequency for each band
The Data Interface
The Interface is the device that connects between your radio and the computer.

There are various types of Interface, and it’s important to get the right one for the job. Here’s what you need to know:
- CAT – Computer Aided Tuning… these allow your computer to change the frequencies and settings on your radio
- PTT – This means that your computer can use the Interface to get your radio to transmit
- DATA – Your Interface needs to be able to handle data transfer and balancing the audio levels between the radio and computer. It also needs to support the baud rate used by the data mode in question
- CW – If you’re looking to use your computer to send and receive Morse, check that your Interface supports CW
- Connectivity – Make sure that your Interface is suitable to connect to your radio, and get the correct leads
Balancing the Audio
All of the data modes we’re covering here rely on audio being sent and received over-the-air. Your computer’s audio soundcard does much of the work. The key to working data modes is to get the audio levels to and from the computer to be ideal:
Level into computer: Make sure that the software is getting the right audio level from the computer. You may need to adjust the soundcard volume, input volume on the software, or the level from the Interface. Software will have an “ideal” range, and you should hit this
Level from the computer: You need to make sure that the audio leaving the computer is of the correct volume (and not distorting). You may need to adjust the soundcard output volume, or the transmit level from the Interface. You also need to make sure that your radio is not activating the ALC (Automatic level control) as this can alter the quality of the data being sent.
WSPR (Weak Signal Propagation Reporter)
This mode is a send-only mode. You send out, over the course of a minute, a data signal containing your location and callsign, and can then check online which stations received your signal.

- Download the WSPR software, free from physics.princeton.edu/pulsar/K1JT
- Keep your PC clock in sync with Dimension 4
- Check how far out your signal is reaching on WSPR Net: wsprnet.org
Want to give WSPR a try? See Getting Started with WSPR
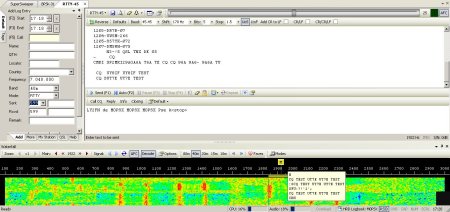
JT65 / JT9/FT8
These modes are a little like WSPR, but they allow a two-way exchange. To avoid splatter with other transmissions, keep the power low (max 25 watts).
These modes allow sending short messages. With JT65, each “over” takes one minute. The newer FT8 is faster (an “over” every 15 seconds)
Messages are typically 13 characters long, and go something like this: “CQ with location, Reply with location, RST, RST, Report Received, 73, 73”
As with WSPR, the PC clock must be spot on. Keep your PC clock in sync with Dimension 4

- Want to work JT65? See our What is JT65? page.
- Want to work FT8? See our FT8 – The Basics page.
RTTY
Standing for Radio Teletype, this mode supports two-way QSOs – you type in real-time, and your message is displayed at the other station almost instantly. It was the forerunner to PSK31.
You can play with RTTY either using Ham Radio Deluxe, or the rather more complex MMTTY
PSK31
Stands for Phase Shift Keying with a bandwidth of 31.25Hz. This allows a two-way QSO, and typically uses macros for common phrases.

- We recommend the Ham Radio Deluxe package for PSK31 – From version 6, you need to pay a fee to buy the software, but version 5.2 is still available (and legal) for free – Download Ham Radio Deluxe v5.2
For more on PSK, see our PSK31 – The Basics page
Slow Scan TV
Send and receive images. Formats include Robot / Scottie and Martin. Images use around 3kHz of bandwidth and take between 1 and 2 minutes to download.

- The most well-respected package for SSTV is MMSSTV, which is free from: hamsoft.ca/pages/mmsstv.php
Want to find out more about Slow Scan TV? See our SSTV – The Basics page
APRS /Packet
Packet data is sent in short bursts. The most common application for Packet data is for APRS (Automatic Packet Reporting System). You’ll need a TNC (Terminal Node Controller) to send and receive packet data
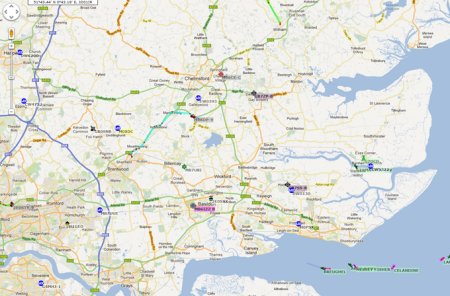
If you tune in to 144.800MHz, you’ll hear APRS packets containing status messages, locations and weather information. To use APRS, you’ll need a TNC, GPS receiver and either a Transceiver or the Internet.
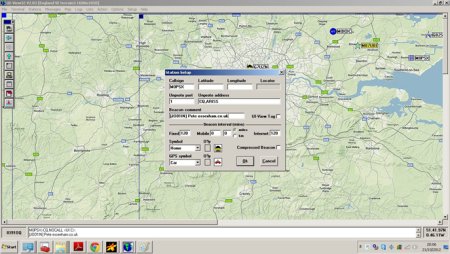
- Software: We recommend UI-View available from www.ui-view.net
- To check out Essex amateurs, see the map at : www.aprs.fi
Want to find out more about APRS in Essex? See our APRS in Essex guide
Data to the ISS
It’s possible to send and receive APRS packets from the ISS. To do this, you’ll need to be set up for APRS. These links will help too. If you’re interested, we can create a more detailed explanation of how to work ISS in packet.
- Check when the ISS is in line-of site using www.isstracker.com or Orbitron software
- Check if the ISS Packet is active here: www.issfanclub.com
- Send and receive APRS packets with UI-View software
- Check if your packet was relayed at www.ariss.net
More on working the ISS: Working the International Space Station
Smartphone software
There are applications available for iOS and Android devices for Packet, APRS, PSK31, SSTV and RTTY. Check iTunes Store or Google Play
See also: Handy iPhone apps for amateur radio use
Dear all at the Essex Ham club,
Firstly I would like to thank you for giving me so many ideas and re kindling old radio memories after reading your club site, most of which at the moment are swirling around my brain .However before I go into details, please forgive me as I have not introduced myself.
My name is Rowland Rees, but everyone calls me Rowli. Callsign GW0RTR . I have been called Mr Rees for 40 years having been a senior teacher in an elementary school teaching/ guiding/helping/ having a laugh, with children between the ages of 7 and 11 and what an amazing privilege that was. I stated a radio club in school and boy, what fun that was. I think the best moment of the radio club was when we were selected to talk to Helen Sharman while she was up in space, one of six schools / collages in the UK. Our call sign GB1JUNO became quite a collectors piece all over the world. A link was never made with Helen as very rude amateur broke in on our transmission even though she was calling our callsign.
To make up for this disappointment , she came to school to see us and invited a group of us to London to the famous National Geographic Building for a chat and meal with her.
Anyway in a nutshell, soon after this, I lost my wife to the dreaded cancer, retired, lost my head a bit. Took to walking the Welsh hills on dry days and painting mad painting ( but some people liked them) on wet days and lost all interest in radio work.
Then one day in a gallery I got talking to a lovely lady whose life, I found out, was also in turmoil…… and together over the last seven years, well words can’t even get near to describing the life we have set up together. Patti my partner has even involved herself fully in my two hobbies of glass fusing and mountain walking, and when we go away in the Vw camper van to various parts of Europe, she even shows interest in my radio work.
Sorry, my short note, is turning into a long note, maybe the reflection of being a teacher. I will try and get to the point as soon as, but felt it important to give you some background as there is so, so much background reading on your web pages, so interesting, but I must confess at the present time, much of which I don’t understand, but am eager to do so, so here goes.
My new QTH, Patties, home is in the tiny seaside village of Mumbles, postal code SA34ND, address, , 9 Langland Rd. If you were to look at this on Google earth you will see the garden is tiny, no room for ground radials, certainly no room for a three element yagi, so I have ordered a Ciro Mazzoni Midi Loop and a rotator. My radio is a Kenwood 480 HX (portable/base), might buy a base later on.
This is what I wanted to ask. Do I order a Digimode Minipro from G4ZLP.co.uk. ?
OR
Or I order a Tigatronics Data mode interface from Martin Lynch & Sons, from where I ordered my magnetic loop and still waiting for delivery into the country ?
OR
Do I order a Micro Keyer 3 Microham, again from Martin Lynch & Sons ?
OR,
Have you got any ideas ?
Just before my wife passed away I did some work on PSK 31 using a PC.
I really enjoyed this. I am now more than ever eager to start learning data modes properly. Having had two of our holidays cancelled this year and unable to use the camper van, with Patties blessing, I am kitting out a little radio shack so I want to make sure I do it properly. I had advice of a local radio ham re the antenna and as he said, I had very little choice with the very small courtyard garden we have, but he knew nothing of data mode. Hence my plea of help.
I am now slowly teaching myself to use my AppleMac Book Pro as both of us do a lot of photography. When this lock down is over, I intend purchasing am IMac, so then maybe dedicating this computer to radio work.
To get me started, and please gently as I am certainly no computer expert, could you guide me to some software to get me going on PSK31, or similar, or whatever simple date made I should start with and maybe other simple date modes that are simple to install and use with the antenna radio computer set up I have.
I am so, so sorry if you are tired by now having read this far and soooooo many questions but I felt it important to give the whole picture.
Keep well and keep safe,
Rowli from little Wales…. :-)
Just read your peice …what a touching story coming through the downs of life I am sure you will enjoy digital modes ..stay safe ,stay well, enjoy your radio
OLLY de G7SWS
Dear Mr Roland Rees GW0RTR
I can help you get started on digimodes and also offer advice on constructing magnetic loop antennas. (Tx and Rx). The software I would recommend for digimodes is FL-DIGI, do a google search for it. As for wiring to the radio etc, contact me and I will try to explain all the options. You can get set up for very little money and best of all, you don`t need massive antennas to makes these modes work. (Good for small gardens)
I am not a member of Essex ham but I offer free advice to any ham radio operators or constructors wherever possible.
Very best regards,
Chris (G7DOM)
contact me g7dom(at)hotmail.co.uk Pls replace the (at) with @
or do a google search for my callsign.
Very touching story Rowli. I am currently contemplating trying some digital modes again, looked at Fldigi but was a bit put off by the fact that the handbook pdf is 580 pages long. I once used HamRadioDeluxe, in the days when it was free, but found it enormously complicated, not really being a computer sort of person. For that I used a Tigertronics Soundcard but have forgotten how to set it up after a few years away from the radio! The reason I am contacting you however, is to say that, after moving a year ago into a top-floor apartment with access to the communal roofspace, I invested in a Ciro Mazzoni ‘Stealth’ loop which has been easy to hide from the neighbours and I am extremely pleased with how far I can get on under 100 watts! I would also be interested in G7DOM’s explanation of how to set up FlDigi.
Best 73, Kit HB9HFB
Some interesting and moving stories. I am a new ham, and thinking about ‘digital’s radio thru’ the computer. Just started and trying to absorb the acronyms ‘PTTY’ etc. I will need something to plug into the radio, as to what that is ??!!. Any info will be gratefully received. Brian
Hi Brian, I realise you asked the question quite some time ago, but this link will take you to a comprehensive list of amateur radio abbreviations and acronyms:
https://rsgb.org/main/publications-archives/radcom/supplementary-information/abbreviations-and-acronyms/
Good luck and 73,
Colin
GM4JPZ