What is WSPR?
WSPR stands for Weak Signal Propagation Reporter. This is a great piece of software that can be used to check how far out your signal can carry. Although it can be used on FM and UHF, it’s primarily a tool that’s used for HF, with most of the activity on the 40 metre and 20 metre HF bands. The system is incredibly good as detecting weak signals, and rejecting interference and noise.
It can’t be used for any two-way discussion – just as a tool for checking how far your rig and antenna can carry your signal.
How does WSPR work?
The software runs on a PC that’s connected to your HF rig. The software tunes your rig to the appropriate frequency, then puts out a WSPR broadcast, which includes your callsign, location and power. It then listens for other broadcasts.
Other amateurs around the world have similar set-ups and use their rig and radio to listen for the WSPR broadcasts and decode them. The software uploads the details of who it hears to the Internet.
The upshot being, you can log on to the WSPR website and see how far your signal’s got, and who you’re able to hear. Here’s a screenshot of 30 minutes worth of activity on the 20 metre band from Essex:

How to use WSPR:
Here’s what you need to use WSPR:
- An HF rig that can be interfaced with a computer
- A computer running Windows or Linux, with Internet access
- A way of connecting the rig to a computer. In some cases this could be an interface box. The interface needs to be able to put the radio into transmit mode and change frequencies. It also needs to connect from the radio to the PC’s soundcard, for the audio.
- The WSPR software – A free download from physics.princeton.edu/pulsar/K1JT/wspr.html
Connecting to the computer
This can be the tricky bit, and to be honest, there are websites out there far better suited to helping with PC-to-Ham Radio issues. All I can really help with, is telling you how I did it with my setup: icom ic-718 HF rig and Windows 7 PC.
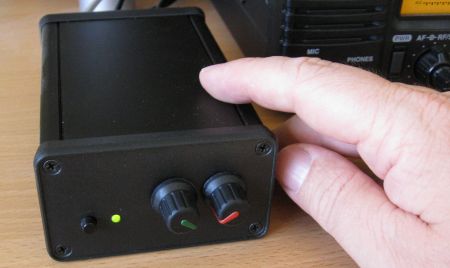
For the connection from the Icom ic-718 to the PC, I use a box called the Digimaster Pro Plus. This was bought primarily to use the PSK31 mode to chat using text on HF. This little box can also be used with WSPR. The Digimaster Pro combines three things:
- CAT Interface – CAT stands for Computer Assisted Tuning, and handles frequency and band switching
- USB Interface – No mucking about with serial leads and COM ports, just plug straight into a PC
- Audio Interface – WSPR signals are data sent as audio, and you transmit via the PC’s Speaker socket, and receive from the computer’s mic socket. The Digimaster handles the audio too

All of the leads I needed came with the Digimaster Pro. To get things to work, here’s what I connected:
- The supplied audio leads between the sound card and the Digimaster Pro
- The supplied lead from the icom ic-718 CI-V socket to the Digimaster Pro (for remote control of the transceiver
- The supplied lead from the Accessory Socket on the ic-718 to the Digimaster Pro (TNC for data communication)
- Supplied USB lead from the Digimaster Pro to the PC
With the connections in place, it’s then a case of setting up WSPR to talk to your rig. For me, there was a lot of trial and error here, not helped by the fact I didn’t read the manual.
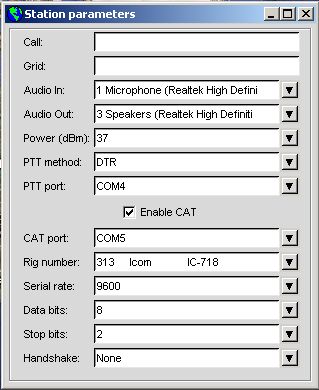
Here are the settings I used in WSPR using the icom ic-718 and Digimaster Pro + interface, but please read on before trying it, as there are some gotchas that may lead you to believe it’s not working, when it is!

Getting Started with WSPR
Now this is where I started to hit problems, and the real problem for me, was that I decided not to read the WSPR manual. Confident that I knew how to use things for PSK31, I assumed I understood how it worked, and didn’t. Apart for the obvious “Read The Free Manual”, here’s what caught me out, and what you need to know:
- The software works in bursts of 2 minute cycles. This is key. I didn’t realise this, so was tinkering with settings wondering why nothing worked. If I’d left it alone for 2 minutes, life would have been different
- Each cycle starts on each even minute, and your PC clock needs to be accurate (Tip: Install Dimension 4 to keep your PC clock in sync)
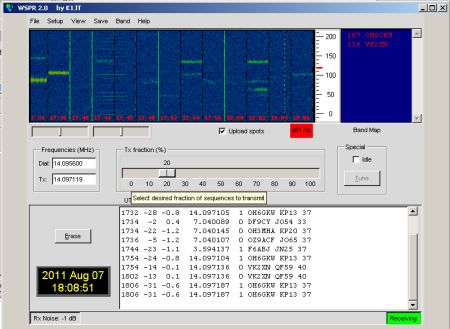
- From the screenshot below, you’ll see a TX slider. This is calibrated in percentages, and determines when you transmit. By default this is 20%, meaning it will transmit once every five cycles – In other words it listens for 8 minutes, transmits for 2 minutes, then listens for 8 minutes.
- You can use the Idle tick box to test that you’re able to transmit
- Levels matter. In the bottom left of the screen is an “RX Noise” measurement. Aim for as close to 0db as possible. If the box is red, there’s an issue with levels. This is controlled using the PC’s Mic input. If your Interface has a receive volume (Green dial on the Digimaster Pro), use this. Otherwise, use the Windows Volume Control to adjust mic gain
- Check ALC, Auto Level Control. The icom ic-718 uses auto level control to “limit” loud audio coming in. This limiting can affect data quality, so set the rig so that it doesn’t use ALC. On the icom ic-718, this means pressing SET to switch the meter to ALC, then backing off the Red dial on the Digimaster until there’s no bars on the ALC meter
Using WSPR
Once everything is connected, and you know what you’re doing, it’s a case of picking a band to use – 20 metres seems the most active, and trying it. I found it was a good idea to use the “TX Slider” and set it to 0% – meaning I’m in Receive-Only mode. I then left it alone and waited for an even minute to start. The software reports “Receiving” in the bottom right, and nothing happens for two minutes. Then it decodes, and shows a slice of what it received.
Here is a screenshot, showing 12 slices (the large blue area):

The screen shown here shows that I have received some WSPR broadcasts – the little green and yellow squiggles in the blue window. In the white window, I can see who I’ve got – This includes time, power, frequency, callsign and the location (4 character Locator)
If I have the “Upload Spots” option ticked, this uploads details of who I’ve heard to the Internet, so that they can be viewed on the WSPR map at wsprnet.org/drupal/wsprnet/map
Summary
That’s the basics of how I got the service to work. There are some other clever things that WSPR can do, but this brief “how to” guide should get you to the point where you can put out a call, and see how far around the world that signal can reach.
In my first day of testing, I got to Japan and Australia, mainly as the conditions were perfect. I’d stand no chance of doing voice over that distance, but a WSPR signal can make it where ordinary audio can’t be heard.
If you have any questions, please add a comment below, and if I can help, I will.


Why is my account still pending after. Two weeks
Thanks regards
cHris
Why my account is still pending after two weeks thanks
Regards
Chris
If you mean register with wsprnet mine took nearly a month.
Richard m0clz
WSPR on android phone.Whats that all about?
Yes works a treat. The app I have generates the tone and I can see all replies via the WSPR server… neat!
Petefmt
This tutorial definately helped me check how far my signal was reaching on WSPRnet, thanks Pete!
I had to change a couple of things though to get it working at my end, i use the same rig what Pete used in this tutorial, an Icom 718 but the software is more up to date (WSPR 2.0 r1714) and the data interface is a MiniProSC.
First thing i had to do was set the Baud Rate on the Icom to 96 (switch power off on Icom, hold Set when turning it on and look for CIV BAUD and set it to 96, switch Icom off then on again).
In the WSPR 2.0 software all Station Parameters were the same as Petes above, except i changed Audio In to the one that said 1. Microphone (USB audio Codec) and Audio Out to the one that said 6. Speakers (USB audio Codec).
And also the PTT Port AND CAT port were both set to the same com port which in my case was COM1.
There may be variation to these parameters on your PC, but hopefully they will give you a start.
73’s
Neil
Interesting site . I have played with wspr before some time ago, using a W7 PC with the same interface box that I used for PSK. The rig was my ic706 mk2g. I wondered if my W10 Acer Iconia tab 8w tablet would do the job? But I think the mic input maybe the problem , what do you think, any ideas?
Anybody tried/got any feedback on v/uhf?
I have one station (GB0SNB) who reports back on my 144.489 WSPR but nothing for 432.300.
Have I got the right frequency?
Thanks
John G0GCD
So, where do you download WSPR 2.0 from please?
All the links I find point to http://www.physics.princeton.edu/pulsar/K1JT/WSPR2 which gives Page Not found errors.
I guess time has moved on and it is not longer available? Or am I missing something?
73 Alan, M0 JSA