
This is the second of a three-part look at some ways to use a Raspberry Pi for amateur radio purposes. For this article, I’ll be looking at how to turn the Raspberry Pi with a £10 USB dongle into a receiver capable of decoding live transponder data from nearby aircraft and showing them on a map – handy for demonstrating radio at public events, and very cheap to do.
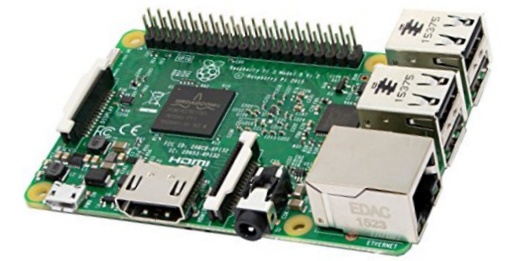
What is a Raspberry Pi?
It’s a £30 computer motherboard. Connect to a screen, keyboard and mouse, and you’re on your way. The Raspberry Pi uses the Linux operating system (as opposed to Windows), and it pretty powerful. There are several different models, and at the time of writing, the Raspberry Pi 3 is the current model, which is fast enough to cope with the cheap RTL SDR dongle, so it’s ideal for amateur radio. You can pick up a Pi online from Amazon – Raspberry Pi at Amazon
Raspberry Pi for tracking aircraft?
If you have an interest in aircraft and tracking their whereabouts, you’ll likely be familiar with the concept – you may even have an app on your phone, or use a service like FlightAware or FlightRadar24 to be able to see what’s flying overhead.
Planes transmit data on 1.090GHz, which is in the range receivable with an SDR dongle. The cheap magmount antenna is pretty good at receiving 1090MHz even indoors, so this makes for a good visual demo of live radio signals. We’ve run a demo of aircraft tracking at a JOTA event, the Southend Raspberry Jam and at a technology competition, and it’s a great visual demonstration of radio in action.
Setting it up
In case you want to try it, here’s a short guide on how I managed to get this up-and-running:
What I needed:
- A Raspberry Pi 3 (Mine was £30 from Amazon, including the Micro SD card pre-loaded with the operating system)
- RTL SDR USB Dongle (£10)
- Micro USB charger and lead (2.5A or 3A power supply, not a 1A version)
- USB keyboard & mouse (any will do, even a pocket keyboard/touchpad)
- HDMI to VGA adapter (to connect from the Pi’s HDMI socket to my old VGA monitor)
Preparing the software
The Raspberry Pi 3 supplied by Amazon came pre-loaded with the Raspian operating system on a Micro SD card, and out of the box, booted up to a desktop. In the past, I’ve purchased a Raspberry Pi that came without an operating system, meaning I had to download an install one. Getting one all ready to run was a bonus.
If you have a Pi, but no software, then it’s a case of downloading the Raspian OS, and using Etcher or Win32DiskImager to flash it to a micro SD card.
With the Pi switched on and running Raspian, the first step was to connect the Pi to the Internet. The Pi 3 supports wi-fi (icon, top-right), and getting online was as straightforward as connecting any smartphone or laptop to a wireless hotspot.
With the Pi now running, you’ll need to install two lots of software – one to run the RTL SDR dongle, and one to track aircraft.
The first package you need to install, is the RTL SDR drivers. Here’s how to do it:
Installing SDR drivers
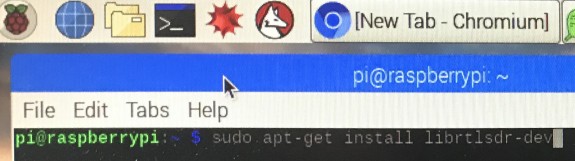
To install the software and drivers, you’ll need to enter commands into the Terminal window – you can open Terminal by clicking on the black icon with the white”>_” icon (on the top left bar). With Terminal open, type in the following and press [Enter]
sudo apt-get install librtlsdr-dev
sudo apt-get install libusb-1.0-0-dev
This will download and install all of the files you need. It may take a few minutes.
Installing Dump1090 tracking software
Now, to install the tracking software, called Dump1090. Again, in Terminal, type each of the following lines one at a time and press [Enter] after each one:
cd /home/pi/
git clone git://github.com/MalcolmRobb/dump1090.git
cd dump1090
make
You should get a confirmation message, and that’s it.
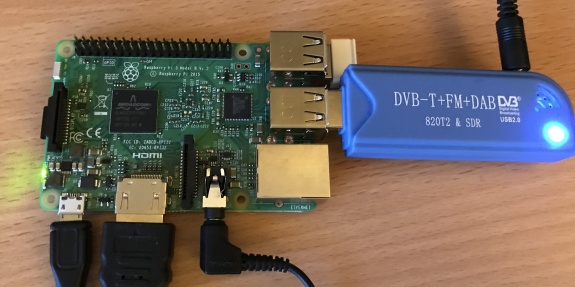
Getting it running
Now, plug in the USB dongle (if it’s not already in) and plug the antenna into the dongle.
Back in Terminal, type the following and press Enter after each line
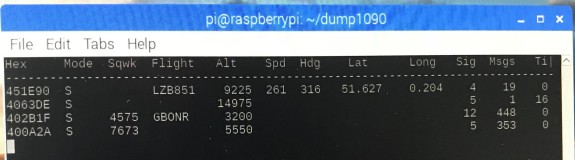
cd dump1090
./dump1090 --interactive
If all’s gone according to plan, you should get a window displaying aircraft data
Want to see it on a map?
With a small change, you can have your data overlayed onto a map. All you need to do, is enable network sharing of your aircraft data. Next time you start dump1090, add a “–net” to the end, link this:
cd dump1090
./dump1090 --interactive --net
Next, you need to find the IP address that your Pi is using for its Internet connection. To do this, simply hover over the wifi icon (top right of screen).
With this information, open the Pi web browser, type in the IP address, followed by a colon and the numbers 8080. for example
"http://192.168.1.100:8080"
If you’ve done it right, you should get a map display overlayed in real-time with aircraft:
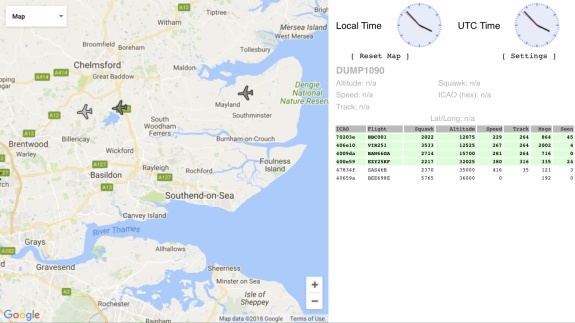
This will work on any web browser connected to the same network, so you can disconnect the screen from your Pi, and see the aircraft you’re tracking on any PC, tablet or phone connected via the same wi-fi router. Nifty!
More stuff that you can do with Dump1090:
There are even more options available with Dump1090software on a Raspberry Pi. In the course of writing this article, I found the following article very useful: Dump1090 – Installation on the RPi, by Ferran Casanovas – It details the process of installing Dump1090, using it with PlanePlotter and also auto-starting Dump1090 for unattended use.
You can also configure a Raspberry Pi to update data to FlightRader24, and become part of their spotter network. For details on how to do this, see FlightRadar24 Raspberry Pi Data Feeder
Hopefully, this short article is of use – there are more detailed features out there, but hopefully, this basic guide will get you to the point where you can create a successful demo of live aircraft tracking. If you have any questions, please add a comment below.
Some of the Gotchas:
- Use a decent power supply. In earlier experiments, I found the Pi kept losing the connection to the dongle. Online reading revealed this to be a common issue if not using the recommended current to run the Pi 3. The recommended supply is 2.5A. Some phone chargers are 1A, and I inadvertently used one of these and all appeared well, but it couldn’t power the RTL dongle.
- Running too hot? It’s been suggested that adding a heat sink to the Pi CPU may help to keep it cool.
Hopefully, this short article is of use. If you have any questions, please add a comment below.
One further article on how to use a Raspberry Pi for amateur radio… is coming soon…
Hi,
I’ve been running a Raspberry Pi & TV USB stick for the past 15 months, to get decent coverage I use a 5(?) element co-linear made out of co-ax mounted in the loft fed via a pre-amp (some people mount the ‘Pi’ near the antenna) . I ‘see’ aircraft up to 250 nm in the best directions from here (N through W to SW) providing they are high enough. Most of the time I filter out airliners as I’m mainly interested in traffic around the local (Staverton) airfield which I fly from.
Aircraft tracking is quite addictive and fun – I run two setups here, one outside on the top of my mast using a commercial aerial and PoE to power the lot. The other one is in my loft and has a simple two element j-pole. My two receivers are the top two in the UK on the FlightAware stats!
Another way to do this is using the pre-configured SD card image from the FlightAware site. You simply download it, write it to an SD card and then fire it up. All you have to do is enter a few straightforward parameters and you’ve got a tracker.
Hi – followed your instructions to the end, all seemed ok till I run the program, Column headings and seperator appear but no aircraft, seems to be connected to dongle as scrolling up reveals details about the Dongle gain last line “Gain reported by device: 49.6”
Plugged dongle into a windows PC – HDSDR works fine, and at 1090 I can see (and hear) the usual ‘crackling’. The Pi is an old one with 256M 700Mhz Proc – single USB with 4 way USB port expander, Clean raspian install + your instructions, any ideas? -73 M0TAP
Just posting my experiences. Followed the instructions above and now have Dump1090 running on a RasPi Model B (oldest version – no overclock), Raspbian Stretch command line interface only, no GUI. System updates took forever (as per). Receiving surprisingly well with the stock RTL antenna on the window sill inside. 40% CPU usage whilst chucking the data out to another PC on the local network for visualization. Great fun – now to build a better antenna and put it somewhere better!
Reference M0TAP’s issue, I wonder if the issue was the presence of the USB hub? I only have the RTL and a wired keyboard attached to my RasPi. Did you ever get it sorted Bill?