
We’re very grateful to Steve M6UEH for putting together the following guide on how to get started with the popular Baofeng UV-5R handheld radio – hopefully, this will be of great help to first-time users of this powerful, low-priced amateur radio handheld
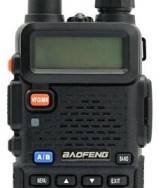
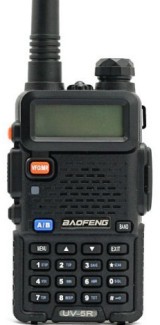
| Baofeng UV-5R 2m / 70cm 5 watt handheld
You can buy a Baofeng from Amazon: Baofeng UV-5R – from Amazon Want a pre-programmed Baofeng with UK repeater settings installed? Service available from Prepcomm UK |
Getting Started with the UV-5R
Here are a few notes to get you started on your UV5R, and I hope you find these useful.
I purchased my UV5R over the internet from a UK supplier. It came complete with the USB drivers CD and the programming cable. I then had to download the programming software. I went to the Baofeng web site for this. It downloaded with no problem.
You don’t have to use a PC to configure your transceiver, but it helps. If you wanted to setup your transceiver via the units own keypad. The info that follows will take you through the procedure.
There are a couple of options that are turned on by default that it’s best to turn off. Having these on will make operating the radio annoying either to you or to the people you’re talking to.
There are three settings for eliminating repeater tail tones or courtesy tones. It is not exactly clear what the differences are in these settings, but you want to turn them all off. There is also a “roger beep” setting that you also want to disable. These are menus 35, 36, 37, and 39. Set all of these entries to 0:
- Press “Menu”, “3”, “5”, “Menu”, “0”, “Menu”.
- Press “Menu”, “3”, “6”, “Menu”, “0”, “Menu”.
- Press “Menu”, “3”, “7”, “Menu”, “0”, “Menu”.
- Press “Menu”, “3”, “9”, “Menu”, “0”, “Menu”.
A Note About the Menu Key
When the Menu key is pressed, the radio will say “Menu”. This key also functions as “Enter”. Thus, after modifying a menu option, press the Menu key again to accept the change. The radio will say “Confirm” to acknowledge a change in a menu’s parameters.
Also be aware that the menu will stay active for a good 10 seconds after changing a menu option. Thus, if you’re changing several menu options in a row, it may not be necessary to press the menu key at the beginning of each operation. You’ll know that the menu has exited if the radio beeps after a length of inactivity in the menu.
Changing Channels Or Frequency
You can set the frequency by using the up/down buttons or by entering the frequency or channel number directly. Note that the numbers speak when pressed. Enter six digits for frequency, i.e. 146520 or 444100, and three digits for the channel number, i.e. 001, 024, or 114.
For frequencies in a 6.25 KHz channel spacing, like 467.7125, enter six digits, such as 467.712. If you have the channel spacing (Menu 1) set to 6.25 KHz, the radio will set the channel correctly. For frequencies in a 2.5 KHz channel spacing, such as 154.5275 set the radio to 154.525 and, with a 2.5 KHz channel spacing (Menu 1, option 0) press the “Up” button once.
See the menu section below for a more complete discussion of setting menu parameters.
Programming Memories
You can program memories either with a standard split or with odd splits. Remember that once a memory is programmed, it cannot be changed, short of deleting it and starting over. Memories store receive and transmit frequencies, along with receive and transmit CTCSS or DCS codes, power level, and channel width (wide or narrow). Power level can be temporarily set to its other value, i.e. the one not stored in memory, by pressing the “Lock” key (the # key on the keypad) while in memory mode. The power level will revert to its stored value if you switch channels, press “Lock” again, or turn the radio off and then on again. Note that this trick to temporarily change power levels only works if TDR (dual watch, Menu 7, discussed earlier) is set to “Off”.
Programming a repeater channel with standard offsets:
- Choose the “A” frequency, printed on the top line of the display. This is probably already done, but if you go through all the steps to program and get a single beep upon the final press of “Menu”, you are in the B VFO and need to press the “A/B” button. .
- If you are in channel mode, press the channel/frequency button. Remember, channel mode will speak the channel number if you press the “up” or “down” button.
- Ensure you are on the correct band. If you enter a frequency and the radio says “Cancel” when you press the last digit, press the “Band” button to select the correct band.
- Enter the repeater output frequency, such as 147060.
- Press “Menu”, “2”, “6”, “Menu”. The radio will say “Offset frequency”.
- For 2 meter repeaters, enter 00600. For 70 cm repeaters in the US or Canada, press 05000. This may be different in other parts of the world. Press “Menu” to confirm the offset amount. The radio will say “Confirm”.
- Press “Menu”, “2”, “5”, “Menu”. The radio will beep but will say nothing. Remember that the first press of “Menu” may not be necessary if the menu has not exited.
- Press “1” for a plus (positive) offset, or “2” for a minus (Negative) offset, then press “Menu”. The radio will say “Confirm”.
- Set the CTCSS or DCS codes for transmit and receive, as appropriate. These are in menus 11 and 12 for CTCSS and DCS receive respectively, and menus 13 and 14 for CTCSS and DCS transmit. CTCSS tones can be entered directly; for instance, enter 885 for an 88.5 Hz tone, 1318 for a 131.8 tone, etc. See below for a list of DCS codes.
- If the menu has exited, indicated by two very short bleeps, one higher followed by one slightly lower, press the Menu key to re-enter the menu. This should not be necessary often, as the menu stays up for close to 10 seconds before timing out.
- While in the menu, press 2, 7, Menu. The radio will say “memory channel”.
- Enter a channel number from 000 to 127. However, be sure not to use a channel number that has already been programmed since the radio will not let you overwrite a stored memory. Programming over a channel with data in it will simply change that channel’s transmit frequency. Once the channel number is entered, press “Menu” again. The radio will say “Receiving memory”.
- Press “Exit”.
- Press the “Scan/Rev” button. This will swap over the transmit and receive frequencies so that they are reversed. This is handy for listening to the repeater’s input channel, in order to determine whether a station is in simplex range or not.
- Press “Menu”, “2”, “7”, “Menu”. The radio will say “Memory channel”.
- Enter the same memory channel you entered above in step 12. Then press “Menu” again. The radio will say “Transmitting memory”.
- Press “exit”. You’ve set up a repeater channel. You will find it in your list of program channels when you switch to channel mode.
Programming A Repeater With An Odd Split
Alternatively, you can specify your own transmit and receive frequencies. In brief, you would program in the receive frequency first, then program in the transmit frequency in the same way. This may be more reliable, since only the “A” display works for programming memories, thus, the radio can only remember one offset value for programming purposes. It does not store a separate offset for VHF and UHF either.
For this method, the offset value (memory 26) and offset direction (menu 25) don’t matter at all.
To demonstrate, here is how you would program in the infamous 147.435 repeater in Los Angeles into memory 99. This repeater has an output frequency of 147.435 and an input frequency of 146.400, a decidedly very odd split. As there is no CTCSS tone, we won’t worry with that in this example.
- If in channel mode, press the VFO/Mem button to switch to Frequency Mode.
- Press 1, 4, 7, 4, 3, 5.
- To be thorough, be sure that no CTCSS or DCS tones are set from a previous operation. Set menus 10, 11, 12, and 13 to 000.
- Press Menu, 2, 7, Menu. The radio will say “Channel Memory”. Then, type 0, 9, 9, Menu. The radio will say “Receiving memory”.
- Press “Exit” to exit the menu.
- Press 1, 4, 6, 4, 0, 0.
- Press menu, 2, 7, menu. The radio will say “Channel memory”.
- Press 0, 9, 9, Menu. The radio will say “Transmit memory”.
- Press “Exit”.
- The odd split is now programmed.
Again, remember that you can use this same procedure to program standard offsets, too. As long as you know the repeater’s input and output, you can program them separately if you wish, and not worry about the repeater offset menus.
Changing Between VFO And Memory Modes
You can switch easily between VFO (“Frequency”) mode and memory (“Channel”) mode by pressing the top most button on the front of the transceiver, labeled “VFO/Mem”. The voice will tell you whether you are in “channel mode” or “Frequency mode”. Channel mode must have at least one channel programmed; there are at least two programmed from the factory, probably more. Incidentally, it’s probably a good idea to delete those channels and put your own data in them immediately. Deleting channels is done with menu 28.
A channel can be directly set by entering it’s three digit number on the keypad, such as 005, 022, or 122 for channel 5, 22, or 122 respectively. The new channel number will be announced via a voice prompt.
Adjusting Menu Options
All menu options can be adjusted from the keypad. You can either scroll through the menu with the up/down buttons, or by directly selecting the menu option you want numerically. So that you can most easily keep track of where you are, I believe selecting options numerically is easiest, as there is, again, no audible indication of when the beginning or end of the menu is reached, and the menus wrap. Note that the menu begins with 0, not with 1. Menu 0 is the squelch adjustment.
As with selecting menus, the menu options can be adjusted numerically. For instance, selecting menu 2 (to adjust the power level), press 0 for high power or 1 for low power. For offset direction (menu 25), you can select 0 for no offset, 1 for a plus offset, or 2 for a minus offset. So, as menu options below are listed, the first option is always number 0, not number 1.
To adjust the menus, press the Menu key, which is the first key on the first row of the main keypad. You will hear “Menu”, at which time you can then enter a menu number or press the up/down buttons. Once you reach the menu you want, press the Menu key again. In most, though not all cases, you will hear voice confirmation of the name of the menu item you have selected. In the cases where you do not hear a voice confirmation, you will just hear a beep. Adjust the parameter by pressing numbers or up/down arrows. Once the menu is set correctly, press the Menu key again. You will hear the word “Confirm” spoken to indicate that the option is set. You can then choose another menu item or press the “Exit” button to exit the menu. If you do nothing for about 10 seconds, the menu will exit automatically. In either case, you will hear a tone to confirm you are no longer in the menu system.
List of UV-5R Menus
0, SQL, squelch level: 0-9
1, STEP, frequency step: 0 2.5, 1 5, 2 6.25, 3 10, 4 12.5, 5 25
2, TXP, transmit power: 0 high, 1 low
3, SAVE, battery save: 0 off, 1 1:1, 2 1:2, 3 1:3, 4 1:4
4, VOX: 0 off, 1-10
5, WN, wideband/narrowband: 0 wide, 1 narrow
6, ABR, display illumination: 0 off, 1, 2, 3, 4, 5 seconds
7, TDR, dual watch reception: 0 off, 1 on
8, BEEP, keypad beep: 0 off, 1 on
9, TOT, transmission timer: 0 15, 1 30, 2 45, 3 60, … 585 and 600
seconds in 15-second increments
10, R-DCS, reception digital coded squelch
11, R-CTCS, reception continuous tone coded squelch
12, T-DCS, transmission digital coded squelch
13, T-CTCS, transmission continuous tone coded squelch
14, VOICE, voice prompt: 0 off, 1 on (older versions), 0 off, 1
English, 2 Chinese (Newer versions)
15, ANI-ID, automatic number identification of the radio: can only be
set by pc software
16, DTMFST, dtmf tone of transmitting code: 0 off, 1 dt-st, 2 ani-st, 3 dt+ani
17, S-CODE, signal code: only could be set by pc software
18, SC-REV, scan resume method: 0 TO, 1 CO, 2 SE
19, PTT-ID, push to talk id: 0 off, 1 bot, 2 eot, 3 both
20, PTT-LT, delay the signal code sending, 0-30 ms
21, MDF-A, (under channel mode the channel displays): 0 frequency, 1
channel number, 2 name (name is only programmable via programming
software)
22, MDF-B, same as menu 21, for b band
23, BCL, busy channel lockout: 0 off, 1 on. [Note: This doesn’t lock
out a channel from memory scan. It prevents transmitting on a busy
channel and is programmed on a per channel basis.]
24, AUTOLK, keypad locked automatically: 0 off, 1 on
25, SFT-D, direction of frequency shift: 0 off, 1 plus, 2 minus
26, OFFSET, frequency shift: 0-69.990 mhz
27, MEM-CH, store memory channels: 000-127
28, DEL-CH, delete memory channel: 000-127
29, WT-LED, illumination display color of stand by: 0 off, 1 blue, 2
orange, 3 purple
30, RX-LED, illumination display color of reception: 0 off, 1 blue, 2
orange, 3 purple
31, TX-LED, illumination display color of transmission: 0 off, 1 blue,
2 orange, 3 purple
32, AL-MOD, alarm mode: 0 site, 1 tone, 2 code
33, BAND, band selection: 0 vhf, 1 uhf
34, TDR-AB, transmitt+ selection while in dual watch/reception: 0 off, 1 a, 2 b
35, STE, tail tone elimination: 0 off; 1 on
36, RP-STE, tail tone elimination in communication through repeater: 0 off; 1-10
37, RPT-RL, delay of tail tone of repeater: 0 off; 1-10
38, PONMSG, boot display: 0 full; 1 mgs
39, ROGER, tone end of transmission: 0 off; 1 on
40, RESET, restore to default setting: 0 VFO; 1 all
PC Method:
After loading the UV5R drivers, follow the setup instructions that came with your transceiver, to check that the drivers have been correctly installed on to the PC and that is has setup a Com Port on the PC.(Usually port no. 4 but can go up to port 8).
I found setting the unit up via a PC to be the best way, as it is a lot easier to set channel names and setup the frequencies (including repeater off sets) and the CCTSS config.
When you first try to start the programming application make sure you have just the programming cable connected to the PC, NOT the UV5R. Windows will try to update the drivers you have just installed. CANCEL THAT FUNCTION……………
If it does update the drivers, I found I couldn’t get the transceiver to talk to the application. In fact the application gives an error message telling you that can’t communicate with the transceiver.
I also found that if the programming cable is not connected to the PC the application will load but will not link to the transceiver once connected.
Now the application has started it time to connect the UV5R to the programming cable.
Setting up to Application:
The application has a standard windows style tool bar.
File, Edit, Program, Communication, Language and Exit.
A step not to be mist is to set the USB com port number within the application. Once you have overcome all those little problems, it’s time to start programming your UV5R.
There is a language setting to be switched to English. Set this on the tool bar.
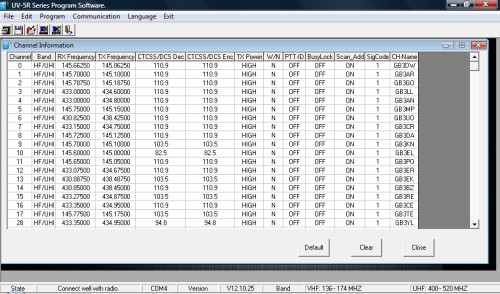
To confirm your PC is talking to your unit. Ask the application to read from transceiver. This will scan the unit and display the channel details currently set on the unit. Use the tool bar or ctl+r
The order of the frequencies, repeaters etc is completely up to you.
I set the repeaters from channel 0 towards 127, and the 2M and 70cm simplex channels from channel 127 towards channel 0. But that’s the way I have setup my unit.
Once you have completed you list :
Chan No., RX Freq, TX Freq, CCTSS Freq, Wide/ Narrow setting, Power, and Channel display ID (repeater name or Simplex channel ID. You are ready to load this confirm to you transceiver. (there are a couple of other functions on list, but I found it’s best to leave as default)
Back to your tool bar or ctl+w. This will upload the configuration. You are ready to go.
 You don’t have to program the unit all in one go. It is something that can be setup and saved for uploading later. If you are doing your configuration this way you don’t need to connect the programming cable to the PC. As you will not be loading the configuration to the unit at this time. But at a later date, where you will require to go through the upload procedure, after opening the file in the application to be loaded.
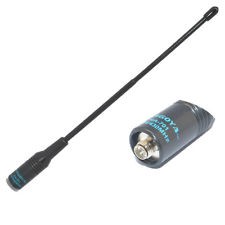
One more thing. The biggest drawback with the unit is the small rubber duck antenna that comes with the transceiver. I suggest you buy a replacement antenna off the web. There is a good range of replacements. Try and find a ¼ wave whip type. It will improve the range you can work.
Enjoy your UV5R.
Steve
M6UEH
Thanks again to Steve for submitting this excellent article. We hope it helps.
The original article “Baofeng UV-5RTips And Hints For Eyes-Free Operation” by KB5ELV, Buddy Brannan deserves a bit of a mention here I think as Steve’s pasted 90%of it verbatim!
See:
http://handiham.org/manuals/Baofeng/Baofeng-UV5R-eyes-free.rtf
Just a quick note that if you purchase the UV5RC with the programming cable option from the web, CHIRP (free) programming software (http://chirp.danplanet.com) is capable of taking existing tables created for you other transceivers and converting directly for this handheld unit complete with all splits and tones effortlessly. Useful as it keeps the same channel number across all your rigs and is much easier to use than that supplied on the disk.
Hi does anyone know where I can get the dat file for all uk repeaters to program my baofeng uv5re plus please
Darren, this is the website which has all of the UK Repeaters on excel, and you are able to save as CSV which Chirp can use to program your radio.
http://www.g0lfp.com/ftb/
Worth a mention, if you are using Chirp to program the UV5R you can do it in CHIRP format at..
http://www.g0lfp.com/chirp
the /ftb/ option is for the Yaesu radios.
Hope this helps.
de Steve (G0LFP)
Thanks Steve
Hi Steve. I just went to the website, and there’s a note from you saying that the CSV generator isn’t working. I don’t have twitter, so I wonder if you have an update you can share about your website? I’ll be moving to the UK in the summer, and I’d like to program my HT. Thank you. 73 de David AE4LH
Steve hi
Thanks for the link. I have tried to upload the Chirp file in CSV to my Windows 10 machine with the newest version of Excel but cannot get it to work. Is there a later version of the file to try please?
Regards
Kevin
My radio is not receiving while in channel/scanner mode. Can anyone help me please? +
Could the squelch be set too high, perhaps?
Baofeng UV5R
i purchased this radio not realizing that it is illegal in australia
my prime reason for purchase was to use the radio as communications while travelling in my van (UHF only) i have no interest or desire to talk/listen
to VHF frequencies In the very rare case that I am questioned about owning this radio I would like to be able to explain that I have disabled the VHF capability.
Can some-one explain how I can disable VHF frequencies with this radio
thanks Max
Hi, You have to use your computer to do that in CHIRP > Settings > Other Settings…
it is NOT illegal in australia
theyre always spoiling the fun!! everywhere but Australia!!! do you require a license what is the restrictions on using it?
Hi,
I want to program the following DPMR frequencies throught CHIRP or Manually. Can someone explain how if its possible.
dPMR446 Channel Frequency (MHz)
01 446.103125
02 446.109375
03 446.115625
04 446.121875
05 446.128125
06 446.134375
07 446.140625
08 446.146875
09 446.153125
10 446.159375
11 446.165625
12 446.171875
13 446.178125
14 446.184375
15 446.190625
16 446.196875
Hi,
It’s possible to program the Baofeng to receive PMR frequencies, either via software on a computer or direct on the radio itself.
We have a guide on programming the Baofeng for a repeater, which is a more complex process. Hopefully this gives you an idea on how to program. If you struggle and need spefici help, please add a comment and we’ll try to help
my boefeng radio will not scan i will hold the scan button down for 2 seconds but it will not scan will somebody tell me how to get it to scan
Thanks for your reply. I have to input the frequencies above but i can’t input the exact frequrency in. Please try and see.
thanks
Check your frequency step settings – You’ll need 6.25kHz for the PMR frequencies – Do this from Menu Option 1 (STEP).
I get a 75 at the end after inputinf 446.103 instead of125 if that make sense
I assume you’re aware that dPMR is digital radio format, and the Baofeng is an analogue radio? This Baofeng will not work as a dPMR transmitter.
As it won’t work as a transmitter, I assume you’re only interested in receiving the data signals used for dPMR? If so, you won’t be able to tune to the exact frequency (which has six decimal places) as your radio only handles five decimal places. You should be able to tune very close to the precise frequency, which will let you receive the signals, but slightly off frequency.
Obviously, don’t transmit – as a) you can’t transmit digital from an analogue radio, and b) you’ll be transmitting on an adjacent channel.
Does that help?
I’ve been out of radio for quite a few years and having bought the rig I found the operating ‘manual’ of little real use. This guide has been a great help. Thanks!
Try this link John
http://www.miklor.com/uv5r/UV5R-Manuals.html
73 John G3ZJZ
Anyone know why I can no longer change channels in channel mode? When I got it, I was advised to make sure I reset the radio… when I did it went to Chinese (which I easily fixed) but now I can’t scroll through the channels. Anyone know how to fix this?
first delete channel (28) then store a new at its place (27)
I had a frind program my call sign into my Baofeng UV-5R plus radio so that it show when I first turn on my radio. I have since changed my call sign and would like to reprogram my call sign to show when my turn my radio on.
Can some one give me the instruction on how to do this?
Hi John. You can’t change this from the radio’s menu – you have to change this using PC software. The following YouTube video shows how to do this using the Chirp software: http://youtu.be/nA7nL-vmgcY
Good afternoon, I have a Baofeng UV-5R and would like to program to lower frequencies, 100000-178000, but I have no cable, can someone help me set by the Baofeng own keyboard ??
Hello
I have purchased the Baofeng UV-5R plus online and it will be arriving tomorrow, I have downloaded chirp software and would like to set the device up to recieve only not transmit, could someone give me a clear instruction on how to achieve this please, many thanks
Chris
Hi Chris – I can’t see a setting in Chirp or on my Baofeng that enables you to disable transmit. You can set output power to “low” and use the memories to set a different transmit frequency, if that helps.
To make it a scanner, just don’t enter the transmit freq,only the receive side and for that pair, there will be no transmit available. Also set to low power as an additional protection though if there is a frequency there, it will be able to transmit a low power signal.
Hi Bruce
Are there any specific instructions or guides for this.
Kind regards
Martin
Hi Pete
Okay thank you,as I am a newbie,I just want to listen and not get in trouble by accidently transmitting so how would I do this manually ?
Regards
Chris
On the radio, the transmit power is menu option 2 (labeled TXP), and programming a memory is outlined in the main article.
In Chirp, you can set the power and TX frequency for each menu item – the settings are in each menu’s column
Hope that helps
I’m in Utah can I use the radio without a license or will I get in trouble
You can use the radio in Utah w/o a license…just don’t transmit. The UV5R makes a great scanner. Just Google for the local frequencies. Even better, contact a local amateur radio club and get your technician ham license. All the sample test questions pool are also on line. It’s really not that difficult…mostly rules and regulations.
Oh and its the baofeng uv-5re 136-147/400-480 mhz
Hi Steve. The radio is capable of transmitting on a wide range of frequencies, many of which you could get in trouble for using without an appropriate licence. What frequencies were you planning to use, and did you have a specific purpose in mind?
Hello. I just purchased this particular radio and was able to program the frequencies that I am wanting to be on; however, when I push to transmit the radio begins to transmit on 000.000. Not to mention that I am receiving no transmissions that I know are going on. All of the frequencies I have programmed in are EMS/Fire in my county. I could use all the help I can get.
Sounds like you have the offset feature turned on. Press “Menu”, “2”, “5”, “Menu” to get to the Offset control and make sure it’s turned off (no plus or minus sign)
I was able to program my radio to transmit on the frequencies that I was having problems with however I still am unable to receive; any ideas?
Hi Pete. So I was able to get my radio to receive and transmit where I work; however, when I get into the town limits of where I live (approximately 20mins away) I only get static and a few garbled transmissions; although I do receive two NOAA stations loud and clear. Any ideas on what I might be doing wrong? Or could this be another issue?
That sounds like a range issue. Handheld radios typically have a limited range – From the top of a hill, I’ve managed about 20 miles, but in a town environment with building around, little more than a mile. Depends on the obstacles between you and the other station.
Connecting the unit to a rooftop aerial, or a mag mount for the roof of your car (if mobile) will make quite a bit of difference to range.
The repeater that my radio in town is pinging off of is approximately a mile away in the next town. The repeater at work is several miles away. Not to mention that there are other individuals in town that work EMS and use their radios in town on a regular basis that are not having this problem. Im lost and frustrated and seriously considering sending this back.
These radios and built to a budget, so aren’t as great as more expensive radios by the less-budget manufacturers. Antennas make a big difference too – Not sure what frequency you’re using, but the antennas are better on some frequencies than others. If you’re able to transmit and receive at close range, but not further away – it indicates that the radio is programmed and configured the right way, but the aerial and/or operating conditions aren’t good enough to make the distance.
hi again
I bought this as I will be going on a pilgrimage so to speak in Nepal,then South America ,I have never used a ham radio before and only purchased it after advice from fellow travellers,at the moment I only want to enable this device to be able to listen only as I don’t have a licence to transmit,so I would like to know two this,what is the procedure on getting a licence and how much would this cost as I would need to transmit if in difficulty whole abroad and second how can I set this up to just listen without a licence in the meantime,I am willing to take any course in the future as I am told this is a valuable piece of kit regarding explorers and travellers,many thanks in advance.
Chris
Hi Chris,
In the UK, the best way to get a licence is with the help of a local club. You can find your local clubs here: https://rsgb.org/main/clubs/club-finder/ – If you’re in Essex, this site can help to get you in touch with a local trainer, or we can arrange for you to come along to a local event and discuss courses and the hobby in more detail.
Fees vary depending on clubs – A typical Foundation course, book and exam costs £40-£70.
It’s important to note that if you want to operate outside of the UK, you need to get the Full licence, which means sitting Foundation, then Intermediate. Once you have the Full licence, you can operate in other countries, but subject to the rules of that country’s radio laws and licences.
This link (and video) gives you a feel for what’s involved in getting started: https://www.essexham.co.uk/how-to-become-a-ham
Does that help?
If you are operating from within UK but speaking to eg US (ie through DMR) is a foundation sufficient?
The Baofeng UV -5R is not a DMR radio, so you can’t make contact with the US using DMR from this radio. A UK Foundation licence will allow you to contact other licensed amateurs from around the world, but the licence can only be used to transmit from the UK.
hi Pete
That makes sense,guess I will put it away until I have passed,just wanted to listen to get use to the device in the meantime,very informative thought,many thanks
Chris
Chris, you can certainly listen. Either try 145.500, which is the “calling channel”, or tune in to the output of one of your local repeaters (See http://www.ukrepeater.net/. Candidates who listen before attending the course tend to do well, as they are comfy with procedures and on-air language.
cheers Pete thanks you for the info
Hi everybody,
this morning I found that the display of my UV-5R changed the language from English to Chinese …
Impossible to use the radio if you don’t know chinese
I couldn’t find in the manuals and web how to reset it back to English.
Does somebody know a trick ?
Thank you
Hi, if you have not found the answer thus far then try this.
1) Press menu and use the up arrow next to the menu button to select menu 14.
2) Once menu 14 (voice) has been selected then press menu once more. This will then let you use the up/down arrows to select either English/Chi or off from the screen display.
3) select English then press menu again and your UV-5R is set to English.
4) press menu a second time after the language is set to English and the radio will revert to the usual VFO/MR screen. You can of course just dont press anything after setting the language and the radio will revert to the usual screen setting on its own after a few seconds.
If still needed I hope that helped,
Bri (M6UHN)
Hi Everyone, has been great reading this, as the supplied manual is not much use!
I have CHIRP software running and an connect to my Baofeng without any problems. I have downloaded the .csv with the UK repeaters, but when CHIRP opens it all of the frequencies are empty and the names say ERROR
Have i done something wrong?
Problem with CHIRP. My UV5RC arrived today and I congifured it OK. I programmed CHIRP with repeater freqs, but it won’t upload. It’s CHIRP 0.4.1.
Problem is that it seems to be a different version to the one shown above. There’s no Communiction button. All there is is a Radio button, but with the option to Upload to Radio greyed-out.
I’ve been to the Baofeng website, and have checked the firmware, BFB297. This apparently is too high for the Baofeng software, so I have to use CHIRP.
Any ideas??
Tnx, de m0ans / Adrian
I have found the solution.
My mistake was to create a new .CSV file with repeater info; CHIRP recognizes it, but it can’t be uploaded.
The trick was to download the existing default config, in .img format, and edit this. By doing this, I could get at the Settings tab. I saved this config under a new name, and edited it with my repeater settings.
Shame that I can’t find a way of converting the Excel .csv file into a format that the rig will understand.
73 de m0ans
Try downloading from your radio, then importing the CSV file, then uploading to the radio. I have several similar radios, but this is the only way to handle all of them with the same CSV file.
Hi,
What does the band selection (menu 33) do?
It’s easy to select a UHF or vhf frequency in frequency mode so why does it have its own menu. What use is it?!
(Only interested in transmitting on UHF
Hello can someone help..I have bought the baefong UV 5r and I have deleted all the channels that I don’t need and I have put four of my own desired channels 454175 454250 454300 454700 but they are not scanning. If I leave it in steady position it works but its not scanning the other channels. Can anyone help how this works in scanning position?
I have used the CHIRP software courtesy of DanPlanet. I have used it to program my UV-5RA. I have, I think, appropriately input the correct information into the software and uploaded to the radio. The offset setting resets itself during the transfer from the computer software to the radio. Does anyone have any idea why that happens and how to change that fact and stop it from happening?
hi guys and yls
I have got a baofeng 5rc and having problems programming it with a computer and the lead I can get the page up when it downloads from the radio I can upload to the radio from the computer BUT when I try to use it through a repeater it shows both + & – and on 70cms doesn’t transmit on the correct frequency is it me as im not computer friendly am I doing something wrong I have even followed an American youtube and it still goes wrong is there light at the end of the tunnel please
My Baofeng Radio UV5R Is Locked Up and cant do anything with it. Stays in the Red and all it does is beeps at me.
Can anyone help me?
Best advice is to try a factory reset, either via the menu or using a programming lead – See for a discussion on how to do this.
hi I have the baofeng uv 5r and I still can’t program the channels I have Reyes everything on line still can’t get anything if there is anybody in Scotland that could set this up for me a would be very great full thanks
would anyone be able to help me, please?
Just got a UV-5R, and am having a “clicking” issue when receiving on e.g. 446 PMR.
Am testing using my daughter’s (surprisingly good) cheap Binatone Action 1100 PMR446 handset for TX.
When receiving this on the UV-5R, although I get very good quality for her, I also get an annoying erratic “clicking” over the top of her voice. It seems to get worse as I move the radio around, shake it, etc. There’s a few clicks every few seconds, seems quite random.
This is about 30′ away down the garden, only, with her in the house.
I can receive her fine, no clicking, on another Binatone, and on two Mitex PMR, without any clicking, so it would seem to be the UV-5R at fault?
This happens with both the stock aerial, and an NA-701, so it’s not the aerial.
Tried a few different PMR446 channels, no difference.
Any suggestions please? I’m not yet familiar with the UV-5R, so perhaps I’ve got a setting wrong somewhere?
thanks much indeed…
Dual watch may be selected. Check to see its turned of. Menu 34
Hello, I have two questions. First, I have a transceiver that that I scan with and transmit on. When I transmit the scan mode goes off and I have to manually reset the scan button to scan mode. Is there a preset that will cause the unit to return to scan on it’s own after e few seconds when I am done transmitting?
Second, depending on where I am, some channels get interferance that sounds like a fax modem or a computer modem. The channel then locks on and it is annoying. Can this be adjusted so it wont happen on the channels or must I delete the channels that do this? I have tried every squelch mode and it does not help. Thanks
Set radio to Narrow band. Menu 5. This will help reject unwanted inference. BUT. Won’t stop strong signals like Pagers and data traffic. There is no fix for the scanning setting. Once your press the PTT is halts the scanning.
Hi, Just received my UV-5R, but am having issues connecting to CHIRP so wondered if anyone could help?
I’ve installed the driver 31/07/07 3.2.0.0 Prolific. In Device manager all is good. No yellow warning. It’s on Com 4.
When I try to download on Com 4 (Baofeng UV-5R) I get an error “radio did not respond”
It does try to get data, but the screen shows all characters, and then resets.
If I unplug the USB cable from the computer while still plugged into the Baofeng, it sticks on transmit.
I’ve tried different volumes on the unit from low to high, connecting in different orders to PC, plugging in powered/non-powered, plugging in on a channel in use, and not in use, but noting seems to work.
Dodgy cable maybe?
Many thanks
Nick
Try going to their website. I did, got mine working and programed. Go step by step. You’ll be just fine.
hi I had the same problem when I bought a cheap cable I then borrowed a friends cable that came with his baofeng and it worked first time
hope this helps
Thanks guys.
I’ve ordered a better looking more expensive cable to see if that’s the issue.
I get that sometimes with my cheap uv5r lead I just hold it in tighter and it works fine.
Richard.
My baofeng wont let me talk to any it just beeps at me when I hit the button
Hi,
Sorry this happened to you. This also happened to me. You got locked out. You can not do anything with it. Just return it and get another one. I now have 3 portables, and 2 mobile units for my business.
They are really great radios.
Hope this helps you. Good luck.
I have a couple of Baofeng radios (UV-5R and BF888S) along with a couple of older FDC radios (150A and 450A) and recently tried to program in the UK PMR446 channels for receive only on the UV-5R. I noted all the options for turning off CTCSS and DCS tones in the software (I used Chirp) and progammed the frequencies with no problems. However, with a PMR446 radio in the same room as the UV-5R, I wasn’t picking anything up on any of the 8 channels….it was only later that I noticed if I pressed the MONITOR button to defeat the squelch then it received fine….I know that the PMR446 had no tones set as the model didn’t have that option and the BF888S also programmed with the same channels in exactly the same way as the UV-5R worked fine…..what am I missing here? Any ideas please…..
Maybe this is a stupid question but, the 5R+ has 127 memories. There are two memory channels for each number ( channel 1 A and 1 B) How do you program B from Chirp? Is there 254 channels (127a+127b) we can program?
B channels are the same as A. The freqs of channels 1-127 on A will be the same as for B. You don’t have 254 freqs available to program. This way you can be on channel A5, but monitor B64 for radio traffic.
Hi, I’m hoping you can help me, this may seem a stupid question but I cant seem to find a straight forward answer regarding these units.
My son and myself are wanting to get some reliable (cheapish) 2 way radios that will provide decent range (up to approx 1km separation) in wooded and urban areas.
Would these be suitable and would they be UK legal without any form of licensing, or would we need to obtain licenses?
Simon,
The Baofeng UV-5R are transceivers for the amateur radio bands.
Therefore to transmit with them you would need at least a foundation licence.
Regards,
George.
I have uv-5r unit and i can’t reach the frequency 129.000 down.anybody can help me to reach that frequencies?
I have a Baofeng gt 3 when i programme a Channel I press five of the six numbers and when I press the six number it says cancel And they all go back to 0 please can you help me many thanks.
Hello,
could you receive a frequency with 5 digits after the comma with the baofeng uv 5r? 164.6425
yhanks
I am also battling with this , have you found a solution yet?
I have RT Systems Programming for UV5R, can someone tell me what the Both N, TN-RR, TR-RN, Both R is referring to when I program DCS in Transmit
is there a list of channels that would help get people started on the baofeng ie calling channels and channel steps or even a download to copy to the radio..
what menue is used to make unit SCAN FREQS OR SCAN CHANNELS.TKS.
Hi how do you enter a 5 digit instead of 6? I try zero before the 27.275 but it wont let me plz help thnkyou.
SO FRUSTRATING!! I have the Baofeng UV-5R, I can transmit perfectly fine, and my transmissions are heard by my group fine (they use Yaesu). However, when anyone transmits to me, I can hear them, but it’s so distorted that I can’t understand what they are saying. On our close up initial radio checks, everything is fine and I hear them loud and clear. However, once we are about 1/4 mile apart with a clear line of sight, it goes south. I added the Nagoya 717 but no improvement. We are operating on VHF 146.460. Can someone please help?
I can hear people on the radio but no one can hear me. I am confused about the CTCSS also. Is this my problem?
I’m a new Foundation licence holder with a UV82L which I’ve managed to get working on the local repeater at Buckhurst Hill but am otherwise confused about which frequency’s I am allowed to use for voice calls. I’ve studied the band plan but its not clear to me exactly what frequency’s I am welcome to program into my device. Is there a default program list I can down load? Can anyone advise?
Robert, take a quick look at UKrepeaters.net and that give you some more repeaters. Where you are you sound local to me so you should have GB3HW in range. Also take a look at http://rsgb.org/main/operating/band-plans/vhf-uhf/144mhz-band/ which is the 2m band plan.
I have a couple of Baofeng radios (UV-5R and BF888S) along with a couple of Retevis RT7 radios. The BF888s and Retevis RT7’s are programmed to the same frequencies to allow them to work together but when I program the same frequencies into my UV-5R I get nothing on receive from the other radios unless I defeat the squelch. I noted all the options for turning off CTCSS and DCS tones in the software (I have used Chirp and VIP) and progammed the frequencies with no problems. What am I missing here?? I know that the other radios are programmed with no CTCSS or DCS and the CHIRP / VIP software tells me the same for the UV-5R so I am confused. The radios are in the same room so surely a squelch setting can’t be the reason…..oh and just to confuse the situation further….the other handhelds pick up the UV-5R perfectly so it is JUST on the receive side. Any advice would be appreciated.
Hi Ian,
If the Baofeng can’t hear signals from the other radios, the most likely causes are either the squelch on the Baofeng is too low, or the other radios are sending CTCSS/DCS (and the Baofeng’s not set to receive them).
If you’re 100% sure the other radio aren’t transmitting any tones, then check that the ‘CT’ and ‘DCS’ icons on the Baofeng screen are off.
Failing that – may be that you’ve set the Baofeng into an odd mode – Back up the Baofeng’s memories (if there’s anything there you care about), then perform a reset to factory defaults. Forget the memories for a minute, and just manually tune to the frequency that the other radios are transmitting on. That will eliminate any possible programming errors or odd radio settings. Once you’re comfy the radio is working in receive mode, then try again with setting up the memories
Pete
Hell I get the repeater on one side when I program it but when I to the channel side I can hit the repeater but I can hear people talking…help…thanks
Hello when I program the v side I can hit the repeater as soon I go to the channel side I can hear people but it will not hit the repeater….sorry the first post dang auto spell
Hi I’m trying to configure a Baofeng to work with Motorola T80s in Group mode… has anybody had any luck?
Hi There , im a 1st time user of a Baofeng UV-5R , when entering the 6 digits for a frequency in frequency mode , the 1st 5 digits enter but as soon as I enter the 6th digit it says ‘cancel’. Any help on resolving this??
Thank you for a very helpful breakdown on the radio use , I have Baofeng uv5r and am still getting used to it and it’s functions
I have difficulty manually programming UK business light frequencies – anyone know what the frequency steps are?
I spent so much time getting the radio to talk to my PC, or vice versa, I thought I was going to go mad as it was so frustrating. I tried all the recommened fixes, old drivers, new drivers, volume up/down, switch off-plug in-switch on and all combinations thereof, sitting down, standing on my head – well you get the idea.
But I did stop at cutting the connector to fit the radio as in my case this clearly wasn’t necessary and anyway I can’t be trusted with a knife!
However for the benefit of others I seem to have found a simple way to overcome these issues that works, at least in my case. It tends to disprove all the other theories but there you go.
My method was based on the idea that maybe there was some data ‘up the pipe’ when I tried to run CHIRP which was getting in the way of the protocol as it was obvious the program was trying to talk to the radio but failing. Without the benefit of a data stream trace, this was just a guess based on my long, hard won, experience with serial communications.
So this is how I do it.
Connect up the radio via the USB cable to your PC and switch it on – I don’t think it matters a jot which way you do this. Run CHIRP and, as a test, trying sending or receiving data to/from the radio (Radio menu Download/Upload). If it works, great, if it doesn’t (and here comes the secret slightly techy bit), go into Device Manage on your PC, locate the driver under Ports (Prolific USB-to-serial-bridge in my case), right click and disable it. Then, having done that, right click again and enable it! Simple eh?
Now try uploading/downloading (as you wish) from the radio again with CHIRP.
In my case with limited testing this works every time whereas before with all the tests I did my success rate was worse than that of winning a million on the lottery – and no I haven’t in case you are wondering.
Of course this won’t cure ‘other’ issues but it may just help those of you who, like me, were going round in ever decreasing circles!
73s
In scanning mode i listen to two separate towns on the same frequency but on different ctcss tones. I have the two towns entered on separate channels in the radio with their own pl codes. however if town 1 is talking and my radio scans and stops on town 2 first, different pl code, it stops on town 2, with no audio, until town 1 stops transmitting. It appears, unlike other radios, that the pl codes only stop the squelch from opening up but still stop and hang up on the channel anyway. Any ideas on a fix for this problem?
Hi, this is a beautiful and well written guide. May I know why do you need to turn off the “Roger Beep”?
Is the Roger Beep a function that sends a beep to the person receiving the message, after releasing the PTT?
As the roger bleep is not generally used in amateur radio. Also on repeaters most transmit a tone so it becomes redundant.
Hi Pete, A friend has a 5RC and the voice prompt is on but the volume is too low, can that be changed?
I think that’s the voice prompt that says ‘channel mode’ etc. when switched on.
The voice promps are linked to the handset volume… so it should go up by turning the volume up on the handset!
I have UV5R And for some reason I can transmit however I cannot share anything coming over the radio. When I program different channels I don’t hear the beeps I don’t sure and for some reason I can transmit however I cannot share anything coming over the radio. When I program different channels I don’t hear the beeps I don’t through the beep, The automated voice, When I switch from channel mode to memory mode. Maido have programs or hit a button that I need to change on the radio itself so that I can hear the automated voice or hear transmissions?
Can someone help me with this. Thank you
Pls I have 4 pieces of the Baofeng UV-5R radio walkie talkie what the best frequency setting for 10-20klm range thanks from Nigeria .
Thanks
Sorry, but I’m in the UK, and don’t know what frequencies are allowed in Nigeria. Best to check with the Nigerian radio regulators, who are I believe the Nigeria Communication Commission
Any way to get the UV-B6 to send DTFM?
live in Santa Cruz, CA. and need to know what settings to put in so i can listen to local police dispatch. anyone able to walk me through it?
I am a member of Stockport Radio Society and live near Manchester, we are an active club, it is interesting to see the activities you have at your club. I think that there is much for me to look at on this
site. Thank you ,Bob M0CPP
Hi can any one tell me why baofeng bf-f8+ light will not change color Thanks
I just want to listen to police scanner Greg..how do I do that when I don’t know the codes
Dude, you can’t listen to the cops on this LOL
Hi every one
I,m from Indonesia
I,m sorry my English is not well, but I tried to asking something and I hope has a good explant.
I have a problem with my baofeng UV-5R reception on VHF Frequence if I change my antenna rubber duck with another antenna ( Nagoya NA 771, 1/4 wave Home made antenna and AL 800 Telescopic antenna ).
I have check my baofeng UV 5 R rubber duck antenna with my SWR it,s every high, but they have a good receive.
I try to make 1/4 wave antenna with good SWR 1:1 but my baofeng UV-5R have so poor to receive.
Why baofeng UV-5R have poor reception with another antenna ?
Thankyou 73,s
Hi I’m new to this recently brought a Baofeng UV-5R can not tune it in to local frequencies I’m in the UK please. Help
Hi I recently brought the Baofeng uv-5r, im in Portsmouth, Hampshire, UK. Does anyone to hand have the best repeater info i will need to manual tune the set, many thanks, yours sincerely lynda
The Baofeng uv5r is possibly the most convoluted piece of electrical junk i have ever come across,yes it transmits and receives but the maxim of kiss was never at the forefront of the designers minds (nor it seems at the champions of them either) You might be better off spending 20 quid on a book of first class stamps and relearning how to write letters,far more reliable and less involved
doe,s anyone out there know were i can get someone to set up my baofeng uv-5r to receive from and transmit to a baofeng 888s I am new to this stuff so if anyone can help
Try Paul at Prepcomm – https://www.prepcomms.uk/programming/ and tell him Essex Ham sent you :)
i forgot to put on my location in my request for help it is in dartford kent
thanks i will try them peter
Do the Baofeng go faulty often. I had mine a month and already it’s stopped working. I tryed 3 different batteries and it won’t work. Does this happen a lot or am I unlucky.
Hi Pete, very useful thanks. For anyone else like me using a Mac here’s a good video on how to use CHIRP – useful for PC too as the menus are pretty much the same. NB this is on an older version of the software than current latest but is easy to see how the latest works.
I have just ordered a Baofeng UV-5R dual band transceiver from a seller on eBay and looking forward to delivery in the next few days. Just wanted to say “thanks” for taking the time to write about setting-up and general tips for the UV-5R which should help me get off the starting blocks :-)
I do hold an amateur license though I have been off-air for a couple of years due to a house move and other pressing issues so I look forward to using the little rig primarily for monitoring the local repeater(s) and general listening.
Just a couple of questions, are all the Baofeng rigs on eBay Baofeng or are there clones of clones out there? And, has anyone done any checks regarding the spectral purity of the TX? The specs look impressive enough but so often the specs and the actual performance dont always match-up ;-)
Thanks again for a very informative write-up.
73,s
M0AYF
Hi all.
May i ask what is the latest CPS & Firmware please. Is it possible to update the firmware? Also where can i download the firmware.?
Thanks
Tony M0MTD
My UV5R when the battery is running down comes up with the anouncment “mobil tips”
Is there a setting to disable this ?.