
The Slim Jim is probably one of the cheapest and easiest antennas to make, and it’s a very handy one too. You can typically make one of these for under £10, they roll up easily for storage and travel, and are great for use at home, or when travelling, for accessing local repeaters.
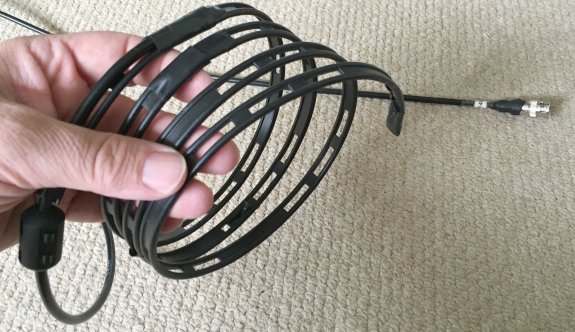
Most people make these for 2m use, but you can make them for 70cm use if required.If you decide to make a 2m antenna, you’ll end up with 1.5 metres of ladder line as the main antenna that can roll up neatly in a coil and can be used hanging from a curtain rail above a window, dropped down from a tree, or taped to the side of a fishing pole and raised into the air.
What you’ll need to make a Slim Jim:
- Some balanced ladder line feeder – either 300 or 450 ohm will do – If making an antenna for 145MHz, then you’ll need a length of 1.5 metres. For other frequencies, use the calculator later in this article
- Some co-ax long enough to reach from the base of the slim jim to your radio
- Radio connector – I opted for a BNC plug, which is easy to adapt for a base station or a handheld
- Soldering iron / solder
- Ruler
- Wire cutters
- Electrical tape
- Optional: Clip on ferrite
| Slim Jim Kits – If you’re interested in getting a Slim Jim Kit, we recommend the Hamtronics Slim Jim Kit |
How to make it:
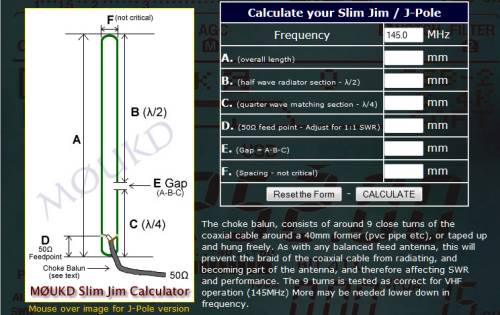
The dimensions are crucial, and here I’d highly recommend M0UKD’s Slim Jim Calculator. You put in the frequency you’re after, e.g. 145.500MHz, and the calculator gives you all of the values you need.
Go to www.m0ukd.com/Calculators/Slim_Jim and print out the dimensions you’re after.
Once you know the lengths you’re after, cut the ladder line to just over the overall length.
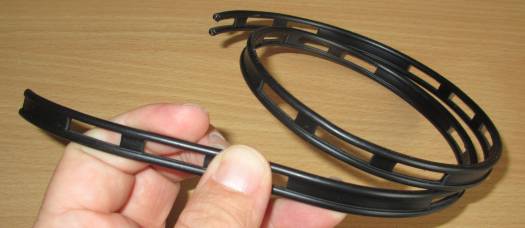
Now, strip off the wire at each end of the ladder line and solder the two wires at each end together – You’re aiming for the top and bottom to be shorted together making the overall length shown on M0UKD’s site.
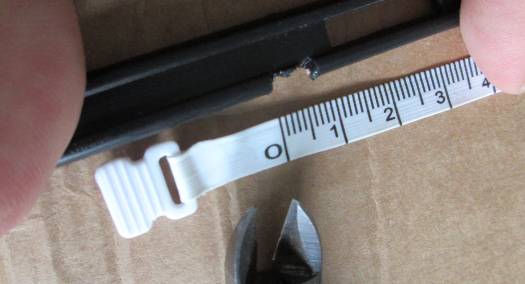
Next, you have to cut out a notch on one side of the ladder line. For a 2m antenna, this is about 2cm and the length and position are specified on the dimensions you’ve got from the M0UKD site.
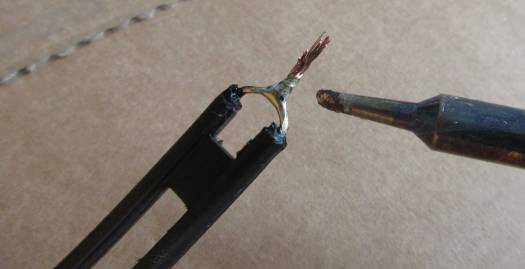
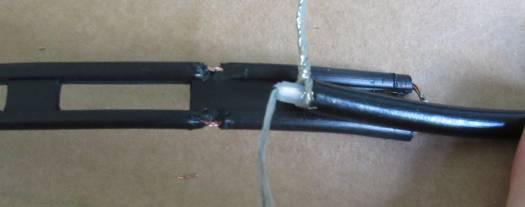
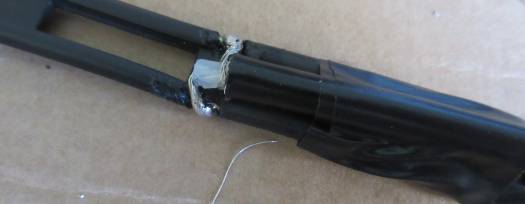
Now you need to solder one end of your co-ax feeder cable to the ladder line. You need to strip off the plastic insulation from the ladder line using wire cutters (at the place indicated on the M0UKD calculations) and solder the inner and outer core of the co-ax to the ladder line. I find it helpful to tape the two together before soldering. You can adjust the SWR by altering whereabouts you solder, but following the measurements has always given me a decent SWR.
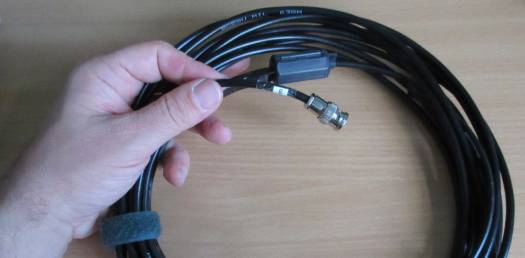
Now, it’s a case of soldering the radio plug onto the other end of your co-ax. This could be an N-Type (common for a base station), PL259, SMA (fiddly to solder onto RG58), or a BNC Plug. I always opt for a BNC as they’re easyish to solder onto RG58 and can be used with an adapter for a handheld or a base station without fuss.
That’s it. Connect it up and test the SWR, then you’re ready to go!
Optional enhancement
Optionally, you can add an “RF choke” at the point where the co-ax meets the ladder line – This helps to stop the co-ax from radiating. From the articles I’ve read, the best type is a “choke balun” (a set of between 7 and 9 tight turns of co-ax around a piece of 20-40mm pvc pipe). For me, this was unwieldy. Following an online suggestion, I tried a clip-on ferrite, which did seem to drop the SWR marginally. Use of a choke balun or multiple ferrites on the coax will no doubt be more effective, but of course increases the cost, size and complexity of this antenna.
Tried it? Let us have your comments…
More information on Slim Jims
There are plenty of websites out there contain detailed information on slim jims, theory and optimum construction. The aim of this page is to give some basic instructions for building a no-frills Slim Jim for under £10.
If you’re after a more advanced article on construction and theory, try the following article: Notes on the Slim Jim Antenna by Dave Coomber M0UXB
The original Slim Jim for 2m was published in 1978 by Fred Judd 2BCX. He subsequently published an improved design the Slim Jim “ultra” which had a crude capacitor arrangment for fine tuning. I have made both and found the dimensions Fred gives for the original version give a resonance somewhat higher thna 146.7MHz. The “ultra” version seems to resonate even higher at around 146.970MHz. Notsure where M0UKD gets his measurements from but they seem to give a higher frequency than from his formulae. I think it would be useful to publish an article “the Slim Jim re-visited” to include accurate dimensions with accurate measurments form an antenna analyser.
Hi Peter. I’d be very happy to publish either an update to this page, or a new article on the subject. If you’re able to put something together, I’d be happy to publish it on the site. Many thanks, Pete
Where does one buy all these parts?
Perhaps try making the VF nearer to unity. That way the dimensions will be longer.
Just my thoughts DE G1ORG
Hi, the primary reason for that is because very few manufacturers publish the velocity factor of wire and that needs to be taken into the calculations for a slim jim. Also, do remember that what is quoted these days as Gain, is untrue. You will have learned that any quarter wave antenna will radiate at an of angle 30 degrees to the ground plane thus propogating most of your transmitter power into the clouds, The Slim Jim antenna radiates between 4-5 degee’s keeping most of your power at ground level. No antenna has Gain, it should state it’s angle of radiation, not the misleading Gain.
Pete – thanks for responding. Well I had this idea for a Slim Jim “test bed”. There are a lot of variables e.g. length of the two sections, spacing of the elements, position and size of the “gap”, position of feedpoint. I had this idea of constructing a version with the ability to change these variables somewhat (e.g. a “telescopic” arrangement for the elements to slide in an out of each othe and a variable feedpoint). At each position I would make careful measurments of the resonant frequency and SWR with an antenna analyser. As for publishing I thougth about submitting to PW – as they published both original Slim Jims’ in “Out of Thin Air”
Kind regards
Peter G0LQU
Hi Peter. Sounds interesting – I’ll keep an eye out for an article on this in PW. Best regards, Pete
Hi, I have linked to this post and have been asked the following “There is no justification for why that one (referring to the ferrite) was picked so you will need to ensure it does remove all the common mode current at 145MHz on the outside of the braid. You may need more than one. An air choke as (the article) describes is possibly more effective.
Can you perhaps shed some light on this as it is beyond my expertise. Thanks
Hi Richard,
For the best performance, other Slim Jim articles suggest that creating a choke balun, as mentioned in our article, will help to prevent the coax from radiating – This is made by making 9 tight turns of the co-ax around a piece of plastic tubing, secured by heat shrink. For me, this was somewhat unwieldy. Use of a choke is optional, but I tried a cheap clip-on ferrite on my home-made Slim Jim and noticed a slight improvement on SWR, so decided to stick with it.
Multiple clip-ons (the link coming up suggests 6 – £20 from Maplin), or a 9-turn choke balun is bound to be better, but this will increase the size, complexity and cost of this basic antenna.
If you’re after a more technical article on Slim Jims, try:
http://www.hamuniverse.com/m0uxbslimjimnotes.html
Pete
Thanks Pete, that answers his question and the linked article has helped me understand a bit more. The only thing that has me stumped at the moment is ‘velocity factor’ in the calculation as there is no reference to what it refers. I have googled and there seems to be the option of ignoring this altogether so that has left me a tad confused.
When I was trained fro my Full licence, I was told to assume a velocity factor of 0.7 in coax cable, but it depends on what the dielectric is made from. The following article is fairly digestible and quotes 0.66 for polyethylene dielectric:
http://www.radio-electronics.com/info/antennas/coax/coax_velocity_factor.php
To save messing about with the formula, I simply used the calculator here, which generated measurements that worked well for me:
http://www.m0ukd.com/calculators/slim-jim-and-j-pole-calculator/
Pete
Thanks, I was asking that in respect of the U shaped and straight coax baluns shown, as these may be neater ways of creating a balun for a ladder antenna. However I may be swayed toward making one on a piece of pvc conduit. In which case the air core choke would be easy to mount, however carrying around a piece of 1.75m conduit is not going to be as easy…decisions decisions.
To be fair, our article was intended to be a quick guide on how to make a Slim Jim for under a tenner, perhaps as a new amateur’s first antenna. It was never intended to be a definitive guide to the theory or the science behind it.
M0UKD and M0UXB have written far better explanations on the design principles, and you’ll find plenty of discussion and debate online about optimal slim jim construction. This link is worth a look too: http://www.hamuniverse.com/slimjim.html
Hope you have fun putting something together Richard,
Pete
Thanks Pete, your article has certainly sucked me in and I can see where you were aiming. It has made me look at how to adapt this to my own needs as a foundation amateur with only an operational interest and a creative electrical background. This has come about from membership of Sussex 4×4 Response who have over 50 in house trained licenced amateurs who use the 2m band for operational comms. With some static events, a slim Jim on a whip flag pole will come in very handy to gain extra coverage.
I will probably do like you have with a BNC but make the lead detachable at the coax choke. Just for neatness and practicality. Then the choke can drop over the pole and serve as an anchor point for the down lead and potentially a connecting point for guys if needed.
I did try a mobile version of the Ultra Slim Jim in the 1980s. It was made of 300ohm ribbon as described above and then placed inside a 1.5metre length of white plastic electrical trunking tube. It was fine whilst stationary or at speeds up to 30mph but whipped around too much above that. It worked well compared to a 5/8 base loaded whip. I believe the ‘Out of Thin Air’ article included a photo of a 70cm mobile version mounted on a gutter. I also had a 10m quarter wave whip on a bumper mount, which was ideal for deterring tailgaters !
Just wanted to say that I’ve made two slim jims now, based on this article and the size values based on M0UKD’s calculator, and they both work a treat! Thanks so much for allowing a foundation license holder to finally punch in to a local repeater from his handheld without it sounding like he was speaking into a paper bag.
the beginning reads to use 1.5 meter of ribbon feed cable.then instructs to do the calculation on the linked site (which was a handy little tool). In the UK our frequencies for CB are around 27 – 29 MHz. That calculates overall to around 7.5 Meters of ribbon feed cable for a J Pole and 7.6 Meters for the Slim-Jim. The Wavelength is 11.11 meters. I calculated the Smallest frequency withinb my range as it works out a higher wavelength / longer poles. Otherwise a very informative and handy little tutorial. Gutted – I have around 2 Meters of that ribbon cable – it would have been perfect if my frequencies matched
Thanks for the feedback. The article is entitled “Making a Basic Slim Jim 2m antenna”, so I’d assumed it was clear it was for the 2m band / 145MHz. Nonetheless, I’ll update the article to make it more clear.
Thanks for the article. Please could you advise what one could use if ladder line tape is not readily available. I was thinking of using plain wire with some plastic spacers to give me the appropriate width between the wires. Would this work in your opinion and if so what would be your suggestion for dimensions for the 2 meter band?
Any wire will do. I have made one from mains cable and sticky tape so it looked like feeder. Just use M0UKD s calculator. In my experience they need to be kept away from any thing else and definitely need a good choke to work properly. Have a look at N9TAX s website for a good idea how to mount it. That worked well for me. Otherwise consider making a moxon. I made a good one from 20mm electrical conduit with the correct length of wire just taped to it. Let me know if you want some pics of the moxon.
For Info only, I’ve been using a homebrew 300 ohm ribbon cable slim jim since 1985, excellent results on 2m AND on 70 cm and good swr on both freqs, no ferrites or coax choke fitted !!, all in plastic pipe, so I’ve had no need to make a seperate one for 70cm :) :)
Could you give me your design for this please.
Could you explain your design for your slim Jim.?
Same here Bert, when I was newly licensed as a G7 I wanted to get on air fast, bought a commercial slim Jim (which I wouldn’t do now) and it’s the one antenna I have only used since, must be a good 25 years now. Like yours mine works on 70cm too. I have since made more from ribbon and wires taped on plastic pipe.
Gr8 little antenna.Works very well for me. I’m from South Africa, Limpopo. Using the 2 meter band… 169 Mhz. I was building it accordingly to spec and work wonders for me with very little cost. It is small, VERY MOBILE and excellent to use on the go. I would recommend this to any radio user to have… even for backup or, everyday use. I am using it on my Kirisun PT3600 5w hand held and I-com 5023H 50w base. I am using a 5/8 aluminium exterior antenna, and the Slim Jim is almost working better for me. I am new in building antennas. This was my first build, but surely not my last!!!!! Enjoy the Slim Jim!!!!!
What sort of SWR are people getting for 2 metres, typically 145.500 Mhz? I’m getting about 1:13 to 1:14 which seems high compared to my X30 which gives almost 1:1 swr, I did the calculation for 145.500 as mentioned above. 73s, John G0MHF
Doug g4moi
Have had a 70cm homebrew by m0ukd’s dimensions up about 15ft for years.It gets into my local repeater with no trouble,plus seven others within about 35 mile radius.made of 4mm al.tube,they are so simple to make and with the right weather proofing are maintenance free.Also good for DTMF thru my lv repeater and Anytone rig.Highly recommended.
I’m gonna attempt this in the next few weeks, but I have a few questions first:
1) should I use RG58 for VHF? It works fine, but there are better choices I thought. I have some off-cuts of RG6 thanks to a nice man from Virgin Media. That’s better rated for VHF, and certainly for UHF. Lower loss at those bands.
2) this will be a 1/2 wave antenna. Assuming I’m putting 5W from a handheld into it will that be as good as using a 1/4 wave counterpoise wire attached to the ground terminal of my 1/4 wave after-market rubber duck antenna? Same wavelength, so the only gain would be from any directionality in a Slim Jim (which is debatable, but apparently there’s a small effect) or from the extra height gained by putting it away from the radio and hopefully a tad higher up.
Will report back with results from my QTH in Edinburgh!
I spotted this article whilst looking for something else, as often happens on the “World Wide Wait”, and, although I’m not in “VHF Slim Jim” building mode at the moment, I seem to recall an interesting article in “Short Wave Mag” sometime in the ’70’s.
It was titled, “A sewer pipe antenna”, and described a Slim Jim based around a whip aerial, [quarter wave, I think], the lower section of which, was surrounded by a metal tube about 2″ diameter.
I can’t remember any dimensional details, but it was said to provide a very low radiation angle for mobile working into VHF repeaters.
This was when I lived in North Cambridgeshire, right on the edge of The Fens, so “Low Radiation Angle” was a very useful attribute – I had a short length of 2″ brass tube, left over from working on a house tube, [paper message carrier by vacuum, for the uninitiated, they still use ’em at Tesco, but bigger dia, and for money], and I had a fibreglass sheathed 1/4 wave, but unfortunately, I moved to Staffordshire, and although the brass tube came here, I lost the article, something that has long been a regret.
Try looking at https://www.americanradiohistory.com/Short_Wave_UK.htm for your missing article…
zip ties would work great with the ladder line you could put that anywhere. cool
Does using 300ohm or 450ohm ladder line make any difference to the size calculations?
I have some spare 300ohm and was going to make a dedicated 70cm one. thanks
Not that I’ve found. Built my first with 300 ohm solid ribbon 37 years ago for use with my mk1 FT290 & built a heavier duty one with 450 ohm ladder some 15 years later. I recollect both used the same dimensions. Still got the 290 but can’t find either slim jim however just found a load of 300 ohm ribbon in my junk bin so here we go again!
I’ve built one of these and chose to build it for the 10m band.
With a tuner I can use this down to 40m and even 2m / 70cm, although the radiation pattern for those isn’t too great but it does work.
It can be a great multi-band antenna with a tuner.
hello from finland.its the first antenna what i build with own hands in my garage.
10mm aluminium pipe and plastic box.1.1 swr. then i put ferrite choke and swr rises little bit.
now i send without it.very simple and good antenna.wishes from snowy VAASA.
Just ordered a kit from Hamtrain via your site, Im only just setting out and want to have a listen round and see,
Only a Beofeng but it shoud increase my listening pleaseure,
Any Help please
Hi Ian. As you’ll hopefully recall from your Foundation training, for VHF/UHF, you ideally need to get your antenna up as high as possible, with nothing blocking the path between the transmitting antenna and the receiving antenna. Are you looking for help on making a slim jim, the best way to position an antenna, or help with listening on a Baofeng? Pete
About 5 years ago after a period of learning about antennas for FM and AM, after decades of poor performance from indoor antennas such as dipoles, the Terk, Winegard, etc.
I built mine for US FM (slightly below mid band), and even though its on the wrong side of the house (hanging from a curtain rod) its the best antenna I’ve used since 1972.
http://www.hamuniverse.com/ke4nu450slimjim.html
Never checked to see if it was “perfect”, just know on these 3 FM tuners: Sony ST-J88B (since ’87), Onkyo T-4055 (since ’78), and Kenwood KT-880D (since ’16) they all sound great, and pull in all I want without drop outs from walking by it.
Hello Peter,
I don’t know what I’m making wrong, but my antenna is only resonant on 130Mhz.
I cut the overall length down to 130 cm and even there it is 130Mhz….
I’m using a 300 Ohm ladder. Made the antenna with a velocity factor of 0.96.
That’s a super weird issue!
I asked ChatGPT, because it’s been a while since you posted, it came up with some obvious reasons that aren’t the answer (like the length you change!) but some of these may be pointers of things you can try:
ChatGPT:
It seems like you’re experiencing an issue where your antenna is only resonant at 130MHz, even though you’ve cut it down to 130cm and used a 300 Ohm ladder line with a velocity factor of 0.96. Here are a few things that might be causing this:
Incorrect Length: The length of the antenna is crucial for its resonant frequency. If the antenna is too long or too short, it may not resonate at the desired frequency12. The formula for calculating the length of a dipole antenna is L = 468 / f (where L is the length in feet and f is the frequency in MHz)3. However, this formula assumes a velocity factor of 1.0. Since you’re using a velocity factor of 0.96, you should adjust the formula accordingly4.
Impedance Mismatch: The impedance of the antenna should match the impedance of the transmission line for maximum power transfer. If there’s a mismatch, it can cause high SWR readings12.
Surrounding Environment: The environment around the antenna can also affect its resonant frequency. Nearby objects, the ground, and even the weather can have an impact2.
Feedline and Choke: The feedline and choke can also affect the antenna’s performance. If the choke is inadequate, it can cause unstable SWR readings4.
Velocity Factor: The velocity factor you’re using (0.96) is typically for bare copper or bare aluminium. If you’re using a 300 Ohm ladder line, you might need to adjust it to around 0.94.
Remember, these are just potential issues. You might need to experiment with different lengths, check your connections, and consider your environment to find the optimal setup for your antenna. If you have an antenna analyzer, it can be a great tool to help you tune your antenna12. Good luck!
Hi All,
Having constructed the “Slim Jim” antenna from 300 Ohm ladder feeder and tuned it for a centre frequency of approx 400 MHz , I found it works perfectly well if strung up in free space.
I wanted to house the antenna in some 20mm plastic electrical conduit or similar and having tried this I found the SWR goes from 1.1-1 in free space to approx 3.0-1 in the tube ,
I am curious to know if anyone else has tried this and what was the workaround ?
Thanks
Hi Steve!
I didn’t know so I just asked ChatGTP:
Placing an antenna inside a plastic pipe can indeed affect the Standing Wave Ratio (SWR). Here are some reasons why:
Material and Thickness of the Pipe: The type of plastic used in the pipe can impact the antenna’s performance1. For instance, lower psi white PVC has the least effect on RF, while gray PVC is not good for RF1. The thickness of the pipe also plays a role. Thicker pipes like Schedule 40 and Schedule 80 PVC can affect the signal more than thinner pipes like 200 psi pipe2.
Velocity Factor: When an antenna that works fine in open air is put into a PVC pipe, there’s a velocity factor to consider1. The antenna might need to be shortened to about 68% of its open-air length1.
Physical Structure: A quarter-wave piece of PVC, mounted vertically, will not be rigid and may break unless it is pulled up by a support3.
Antenna Design: Some antennas are specifically designed to be installed inside PVC pipes and are tuned for that thickness of pipe1. Using the wrong type of PVC or putting an antenna not designed for PVC use can lead to poor results1.
Remember, these effects can vary based on the specific antenna design and the exact type of plastic pipe used. It’s always a good idea to test the antenna’s performance after installation to ensure it’s operating as expected.
Hi Pete. I have an old g5rv antenna. I’ll use the ladder line out of that. It has a ladder line to pl250 moulded plug on the end of the ladder line. Can I use that to instead of soldering a bit of coax to the feed point.?
Cheers Lee M7LCW
Hi Lee,
The coax has to be connected to the ladder line at a specific point, not on the end – see diagram above. I guess you could try it at the end, but check the SWR reading before transmitting as it may be off.
Pete
Just made one and i’m impressed , bit of messing about soldering but finally got it sorted , for the money awesome antenna ,